SMD IC Marking: Pin 1, Part Code and Date Code
How to find pin 1 on an SMD IC and which way to count, what the lines on the package mean — logo, shortened part code, date code — how to spot a remarked part and test a chip on the board.
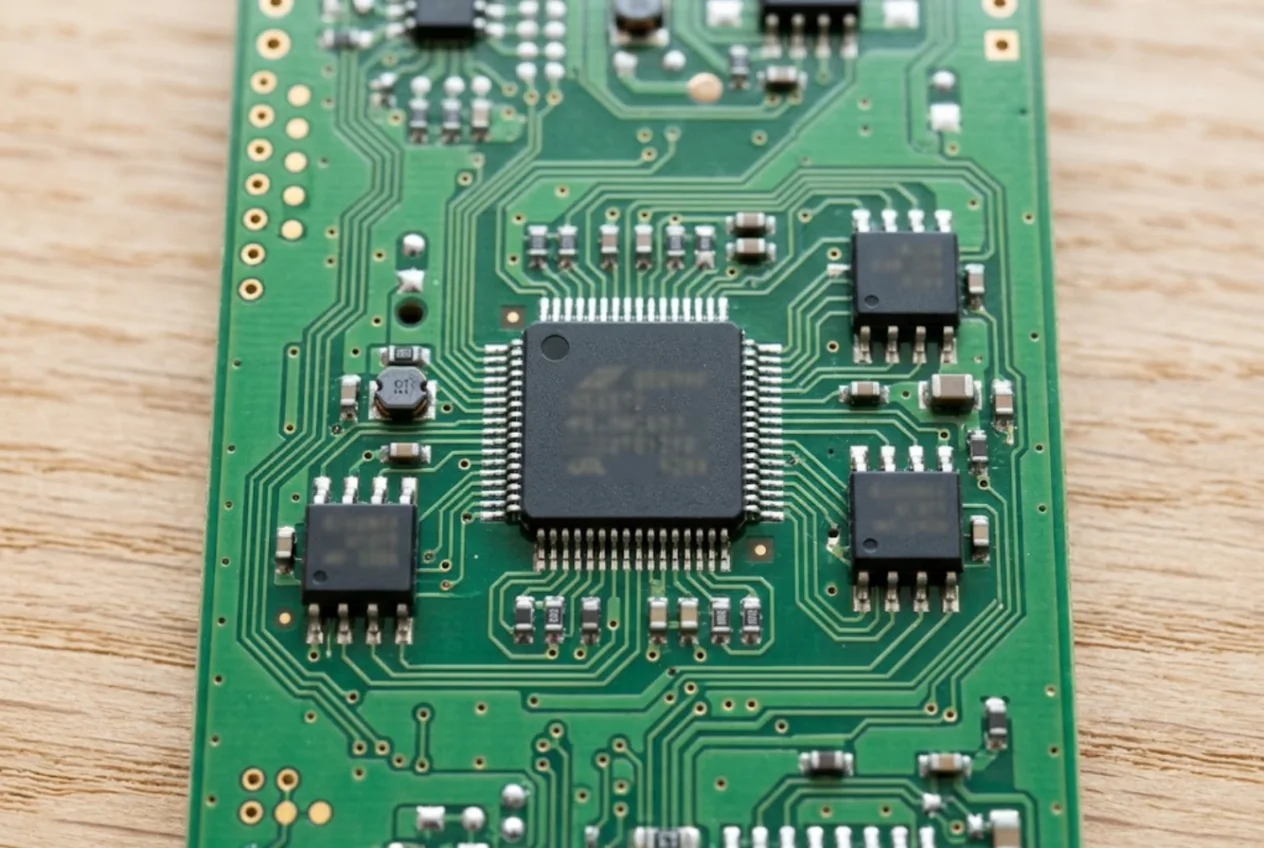
An SMD chip almost never carries its full part number. What you get on top is a manufacturer logo, a shortened device code and a lot or date code. To fit the right replacement you need to find pin 1, tell the part code from the date code, and track down the datasheet. This page covers all three.
Common IC packages
The package name tells you where the pins are and how close together:
- SOIC (SO) — gull-wing leads on the two long sides, 1.27 mm pitch. SOIC-8 is the classic home of op-amps, drivers and serial EEPROMs.
- SOP, TSSOP, MSOP — also two-sided, thinner and finer pitch (0.65 mm for TSSOP and MSOP-8). Many chips come in both SOIC and TSSOP, and the pinout is not always identical — check the datasheet for your exact package.
- QFP (LQFP, TQFP) — leads on all four sides: microcontrollers, interface and audio chips.
- QFN (DFN) — no leads: pads along the bottom edges plus a large thermal pad in the middle. It is often ground, but not always — the datasheet decides.
- BGA — solder balls under the body; you cannot probe them without removing the chip.
Small ICs — regulators, voltage supervisors, single-gate logic — live in SOT-23-5, SOT-23-6 and SC-70. They carry only a 2–4 character code, and you look it up just like a transistor code: see SMD transistor marking.
Finding pin 1
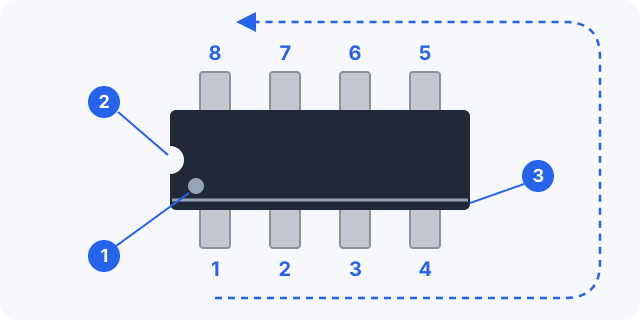
The pin 1 indicator can be:
- a dot — a round dimple or ink mark in the pin 1 corner;
- a notch — a half-circle at one end; with the notch on the left, pin 1 is bottom left;
- a bevel — a chamfered edge along the pin 1 side, or a cut corner on square packages;
- a stripe or triangle near pin 1 — common on QFN and BGA.
SOIC bodies often show more than one round dimple; the extra ones are mould ejector marks. The indicator is the one nearest a corner. When in doubt, check the bevel and the package drawing in the datasheet.
Counting the pins
For SOIC, TSSOP, QFP and QFN the rule is the same: look at the chip from the top, start at pin 1 and count counterclockwise. On a SOIC-8 with the notch on the left, pins 1–4 run left to right along the bottom and 5–8 right to left along the top, so pin 8 sits opposite pin 1.
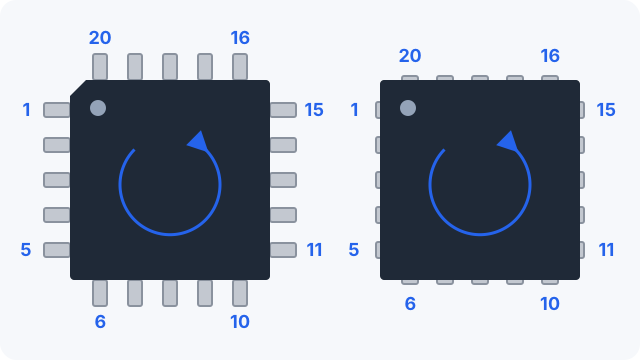
On a QFP, pin 1 is usually the top pin on the left side, next to the dot; some parts start mid-side, and then the mark is there. BGA balls use a grid: rows are letters, columns are numbers, and the A1 corner carries a dot, triangle or cut corner. Letters that look like digits (I, O and a few others) are skipped in row names.
Seen from the solder side, the count runs clockwise. That trips people up when they measure from the underside of the board or follow a bottom-view drawing.
What the marking lines mean
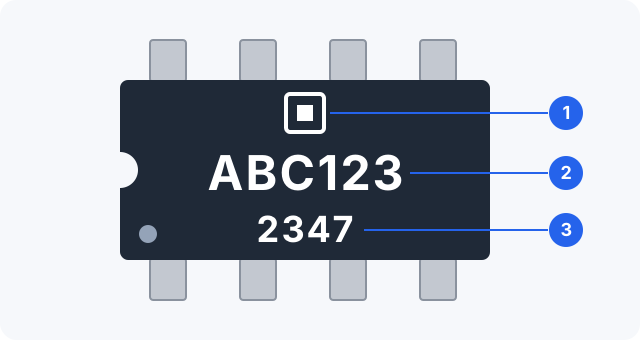
Part code
The full orderable part number includes suffixes for package, temperature range and packing (tape and reel, tube). Most of that never reaches the package. Example: TI’s SN74HC00 in SOIC-14 is ordered as SN74HC00DR — D for the SOIC package, R for reel — but the top marking is just HC00. Other makers print the same HC00 on their 74HC00; the logo tells them apart.
The opposite happens too: a long number spills onto the next line, as Microchip states in the “Package Marking Information” section of its datasheets. TI datasheets list a “Device Marking” column in the ordering table showing what is printed on each variant; several markings separated by “~” mean the chip carries one of them.
Date and lot codes
The most common date format is YYWW — last two digits of the year plus week number. There is no single rule, though:
| Manufacturer | Format | Meaning |
|---|---|---|
| Microchip | YYWWNNN or YWWNNN | YY — last two digits of the year (Y — last digit), WW — week (the week of 1 January is 01), NNN — traceability code |
| STMicroelectronics | PYWW | P — plant, Y — last digit of the year, WW — work week |
| onsemi | AWLYWW | A — assembly location, WL — wafer lot, Y — year, WW — work week |
| Texas Instruments (many packages) | 7 characters: year, month, lot, site | year — last digit, month 1–9, A = Oct, B = Nov, C = Dec; the rest is decoded only by TI |
With a one-digit year you cannot tell the decade from the package: 3 can be 2013 or 2023. The exact scheme for a given chip is in its datasheet, in the marking section.
Finding the datasheet
- Identify the manufacturer from the logo.
- Copy the line that looks like a part code, leaving out the date code. Package and temperature suffixes may be missing.
- Add the package and pin count:
HC00plus SOIC-14 narrows it down fast. - Search on the manufacturer’s site — TI offers a part marking lookup, Microchip has a marking section in every datasheet.
- For SOT-23 and SC-70 parts with 2–4 character codes, use an SMD code book and confirm against the datasheet — the same code means different parts at different makers.
Remarked and counterfeit parts
Signs that a package has been sanded and remarked:
- dull, scratched or oddly glossy surface, sanding marks, a filled-in pin 1 dot;
- different font or print depth across chips from one batch;
- a blurred, crooked or misplaced pin 1 indicator compared with the datasheet photo;
- a date code in the future, older than the part itself, or suspiciously recent for a discontinued device;
- identical date and lot codes on a whole handful of parts from an unclear source.
No single sign proves anything. The safest path is buying from trusted suppliers and comparing with a chip from a working unit.
Testing on the board
Unlike a resistor, an IC cannot be “tested” as a whole with a multimeter. What does work:
- Compare with a good board. Power off, capacitors discharged. Diode mode, one probe on ground, the other on each pin in turn; note the readings and compare with the same spot on a working board. A pin that differs is where to dig.
- Supply. With power on, measure the supply pins against ground and compare with the datasheet.
- Heat. A chip that gets hot right after power-on while its neighbours stay cool is often shorted. Touch only where there is no mains voltage.
- Shorted rails are found by heat, feeding the rail from a bench supply with current limiting.
Typical mistakes
- Fitted 180° off. Match the new chip’s pin 1 to the mark on the board silkscreen, not to how the old part was lying.
- Date read as part code. Four digits like
2347are usually a date. - Similar suffixes. Regulators and voltage references for different voltages differ by a letter or two; different packages of one chip can have different pinouts.
- Counting from below. From the solder side the pins run clockwise.
- O vs 0, B vs 8 — easy to mix up in tiny print when searching.
In short
- Pin 1 is next to the dot, notch, bevel or stripe.
- Count from the top, counterclockwise.
- The package shows a logo, a shortened part code and a date code.
YYWWis common, but every maker has its own scheme — the datasheet decodes it.- Find the datasheet by logo, code, package and pin count.
- Other pages of this guide: resistors, diodes, transistors.
In ServiceCenterSoft, a chip from stock goes into the repair estimate as a line item and is deducted from stock. Stock is kept as a log with quantities on hand, and fast-moving items get a minimum quantity, so they show up under “running low”. More in spare parts tracking.
How do I find pin 1 on an SMD IC?
Look for the indicator: a dimple near one corner, a half-round notch at one end, a bevelled edge along one side, or a stripe or triangle on QFN and BGA parts. Pin 1 is next to the dot; with the notch on the left, pin 1 is bottom left. Extra round dimples are mould marks — the indicator is the one nearest a corner.
Which way are IC pins numbered?
Counterclockwise, looking at the chip from the top, at the marking. On a SOIC-8 with the notch on the left, pins 1–4 run left to right along the bottom and 5–8 right to left along the top. From the solder side the count runs clockwise.
What do four digits like 2347 on a chip mean?
Usually a YYWW date code: 23 for 2023, 47 for week 47. Formats vary by manufacturer, though — some use a single year digit (YWW), add a plant or lot code, and TI uses year plus a month character (A = Oct, B = Nov, C = Dec). The exact meaning is in the marking section of the datasheet.
Why does the marking differ from the part number in the datasheet?
The package carries a shortened code: package, temperature and packing suffixes often do not fit. For example, TI’s SN74HC00DR in SOIC-14 is marked just HC00. What each variant carries is shown in the datasheet ordering table (the Device Marking column at TI) or in the Package Marking section.
How can I test an IC with a multimeter without removing it?
Not as a whole, but you can compare it with a good board. Power off, discharge the capacitors, put one probe on ground in diode mode, step through the pins with the other and compare the readings with the same spot on a working board. Then check the supply pins with power on, and heat: a chip that gets hot at once while its neighbours stay cool is often shorted.
See also
SMD Resistor Codes: How to Read 103, 4R7 and EIA-96 (01C)
How to read the code on an SMD resistor: 3- and 4-digit codes, R as the decimal point, EIA-96 with the full table, 0 Ω jumpers, case sizes 0201–2512 and in-circuit checks with a multimeter.
Read moreSMD Capacitor Markings: Tantalum Codes, Polarity and Ceramics
How to read SMD capacitor markings: capacitance codes in picofarads (107 = 100 µF), tantalum voltage letters, which side is positive, tantalum case sizes A–D and why ceramic chips carry no marking.
Read moreSMD Inductor Marking: Codes 100, 4R7 and R47 Explained
How to read the code on an SMD power inductor or chip inductor: three digits in µH, R as the decimal point, N for nanohenries, ferrite beads rated in ohms. How to tell one from a resistor, how to test it and why inductance alone is not enough for a replacement.
Read more