
General program information

The "Service Center" is designed to account for vehicles, made the service center for the repair of equipment. Profile Service Center can be different from repair and diagnostics of high-precision electrical trivial to repair household appliances.
. Repair can be a "guarantee", "non-warranty", "exit" or "pre-sale"
in the program is the possibility to record in a database chain sequence of actions by employees of the service center: the adoption of the device in for repair until its delivery to the client.
For the convenience of having multiple user groups were incorporated into the program:
- Super Admin
- Administrators
- Managers
- Engineers
- clients
Each group is responsible for what that stage in the organization of the service center, and its availability is a technically sound solution.
In the program "Service Center" is supported by the possibility of using data from several service centers at the same time, providing the output of the required information into a single summary table repairs.
Head of Service Center may obtain information on the statistics of the company and its subsidiaries on a gross basis on the number of devices are to be repaired, renovated, issued written off, devices that are ordered parts. Information can be filtered by date of acceptance of vehicles in the repair.
In the program "Service Center" present detailed statistics on the work of engineers and managers, which also lends itself to filtering for a certain period of time of acceptance of the device in for repair.
Among other features of the program "Service Center" should provide an opportunity to create a list of repairs for a certain period of time to calculate the wages of managers and engineers.
Advanced search allows you to find receipts receipt, using the information for any of sotavlyaet:. Customer's address, name, phone number, fault, engineer, manager, maintenance status, etc. And there is also the ability to filter results by repair type and dates.
The program of the "Service Center" is the possibility to add comments to each repair and view them in a separate section of the program.
For Service Center provides engineers the ability to add certain parts to the list of ordered parts, which is formed in a separate section.
Also worth noting: "Spare parts" section allows you to keep a record of spare parts in the service center, and to correlate them with specific repairs.
When writing programs have been used modern technology, using ajax technology requests and output messages in modal windows, which significantly improve the usability of the program without unnecessary reboots pages and do not need to scroll.
The "Service Center" has support for multiple languages, the ability to use your own design templates.
Separately want to mention the ability to create data manually or automatically backup and restore database repair thereof.
User groups may exhibit different rights to access and use the program sections "Service Centre".
Script program "Service Center" has samopisny engine, which is executed in PHP. In addition, use of the library and jquery jqueryui. As DBMS MySQL.
Program installation
If the program is installed on the web server, you need to:- Hosting supported the work with databases (MySQL) and a version of MySQL-client was not lower than 5.0.51a
- Hosting php version was not lower than 5.2.12
- the server must be installed Zend OPTIMIZER -. If you have purchased a "basic version", encoded by Zend Technologies
If it is necessary to bear in mind that the version php 5.3 and above script will no longer work. The Company also has in place Zend Optimizer for PHP 5.3 has released a new product - Guard Loader. As an option - use the program on a local server, for example Denwer. You need to install the package php 5.2 + Zend OPTIMIZER on the local server, and there is already installed encoded version.In the case of open source software, you can set the engine program to the latest stable versions of php, there will be no restrictions.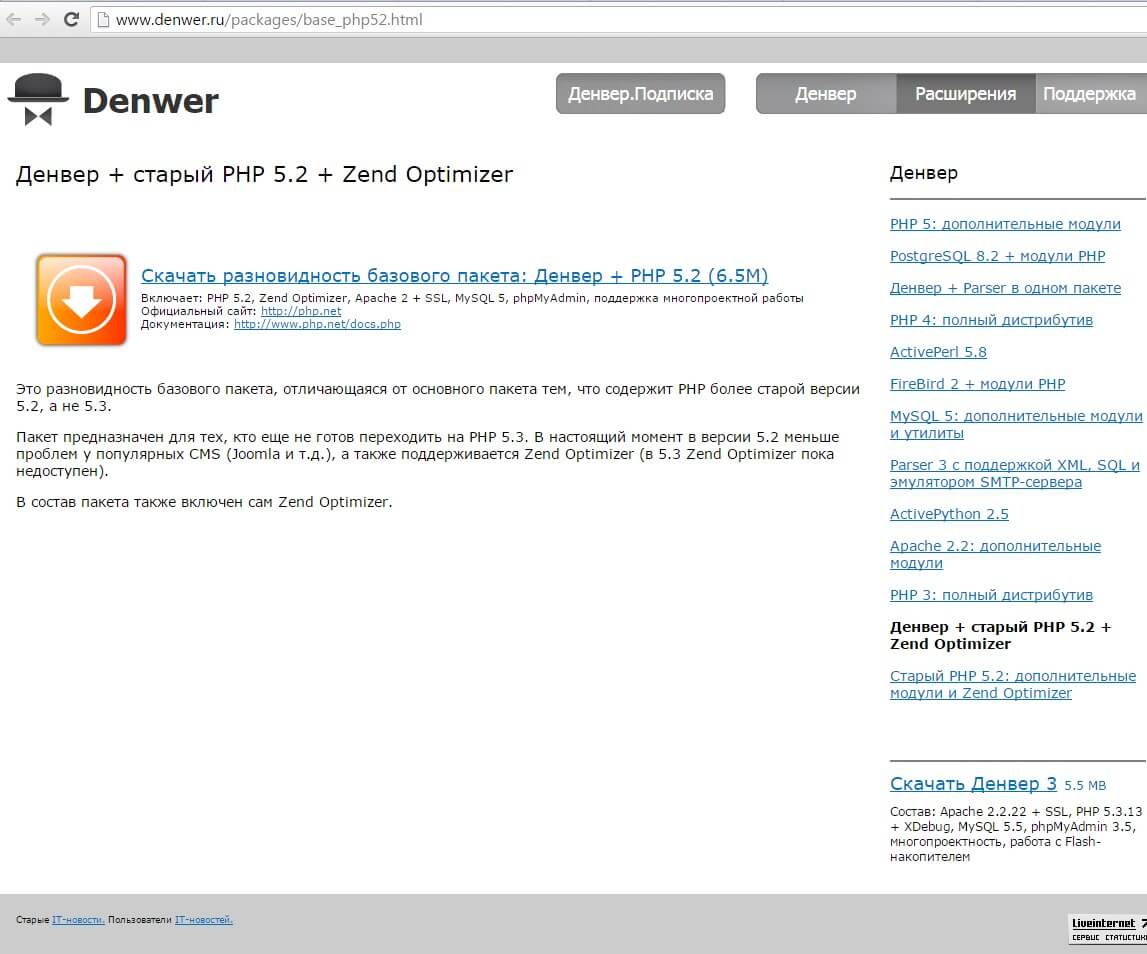
Installing the program "Service Center" on the server is performed in several stages, the following sequence:
- Prepare the server for pre-program: create a domain (or subdomain) to set the encoding is utf-8. Create a database for the program.
- Unpack the archive with the program files on the local computer and fill the server through any FTP client, such as the FileZilla, in binary mode.
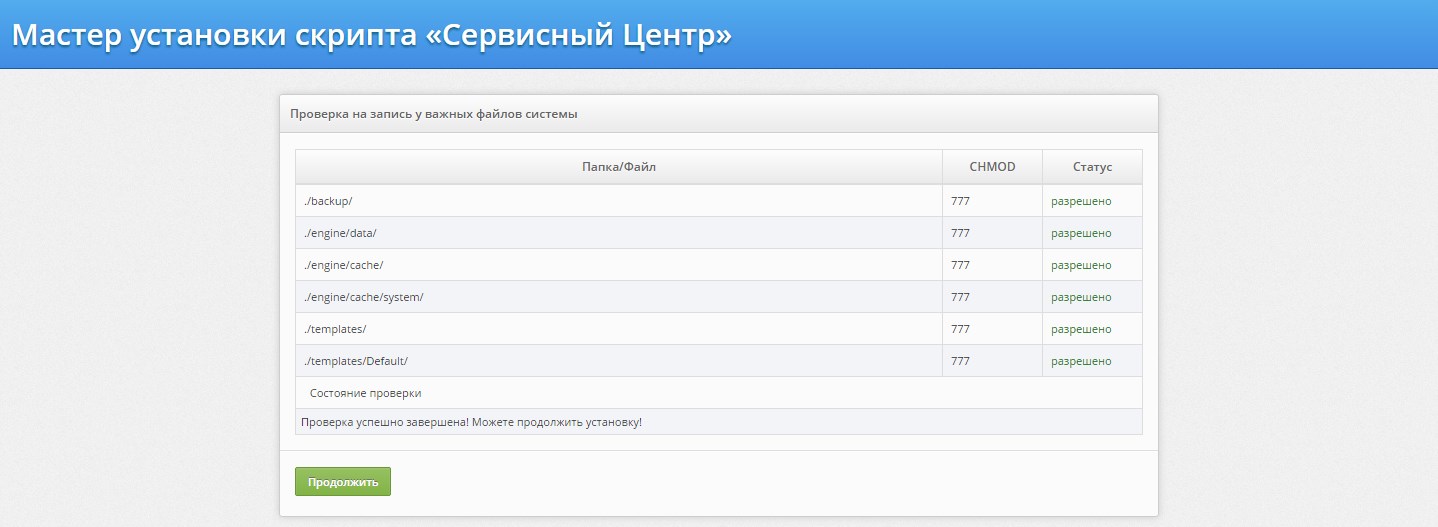
- Align the right to record 777 in the folder:
- backup
- templates
- templates / default
- engine / cache
- engine / cache / system
- engine / data
- Align write permissions for all the files 666 in the folders:
- templates
- engine / data
- Align the right of entry for .htaccess files, 444 folders:
- backup
- engine / data
- templates
- engine / cache
- engine / cache / system /
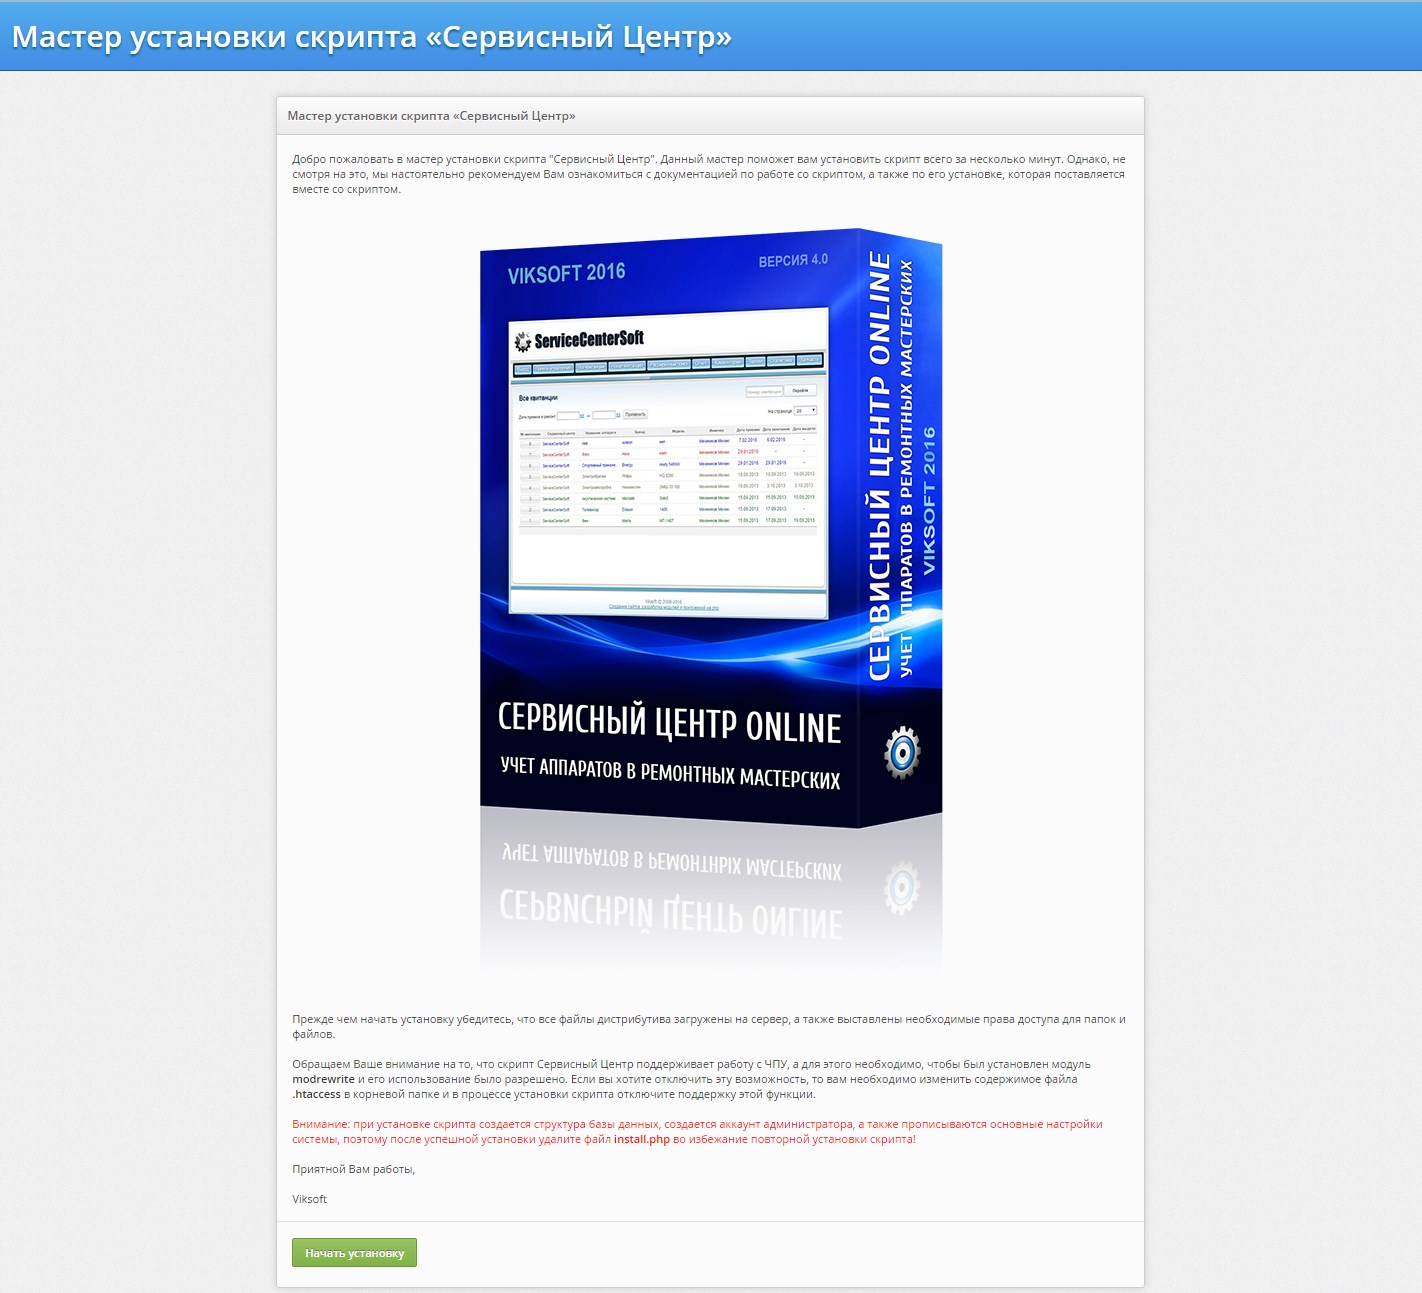
- Open file - Installer in the browser: http: // vash.domen .com / install.php
- Follow the installation instructions.

This is followed by setting the database configuration
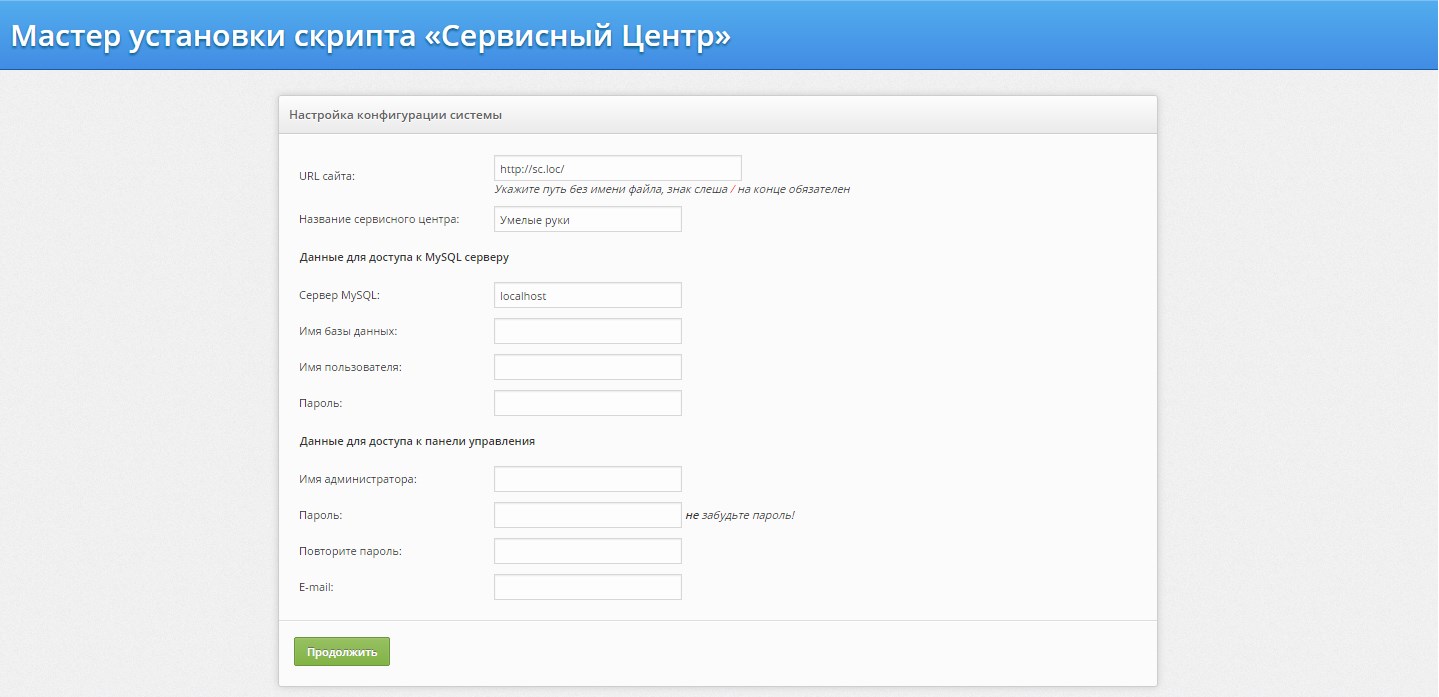
As a result, the database will be created with the necessary tables.
Next, you need to prepare a list of engineers, managers and administrators. The operations you can perform in rezdele "Control Panel" (adminpanel).
To be able to choose the manufacturer and the name of the device from the list when creating a new receipt, be sure to take care of this in advance in the relevant sections.
Working with the program
Familiarity with the program begins with the entrance panel. It is required to specify the username and password for the account to log in.

In the example above the panel has a clue what the login and password can be used. Screenshot made on the demo version you can evaluate here.
Home
We will consider the main sections of the program from the perspective of Super User, what he sees them, and what he can do while on these pages.
After entering the username and password you get to the main page - List of all receipts, in which all the phones taken your odds must be present. Hat home page reflects the name of your SP, the menu in the upper right corner shows the field quickly jump on this receipt. Simply enter the number you are interested in the receipt and click "go" you will be redirected to the page with detailed information on your interest receipts.
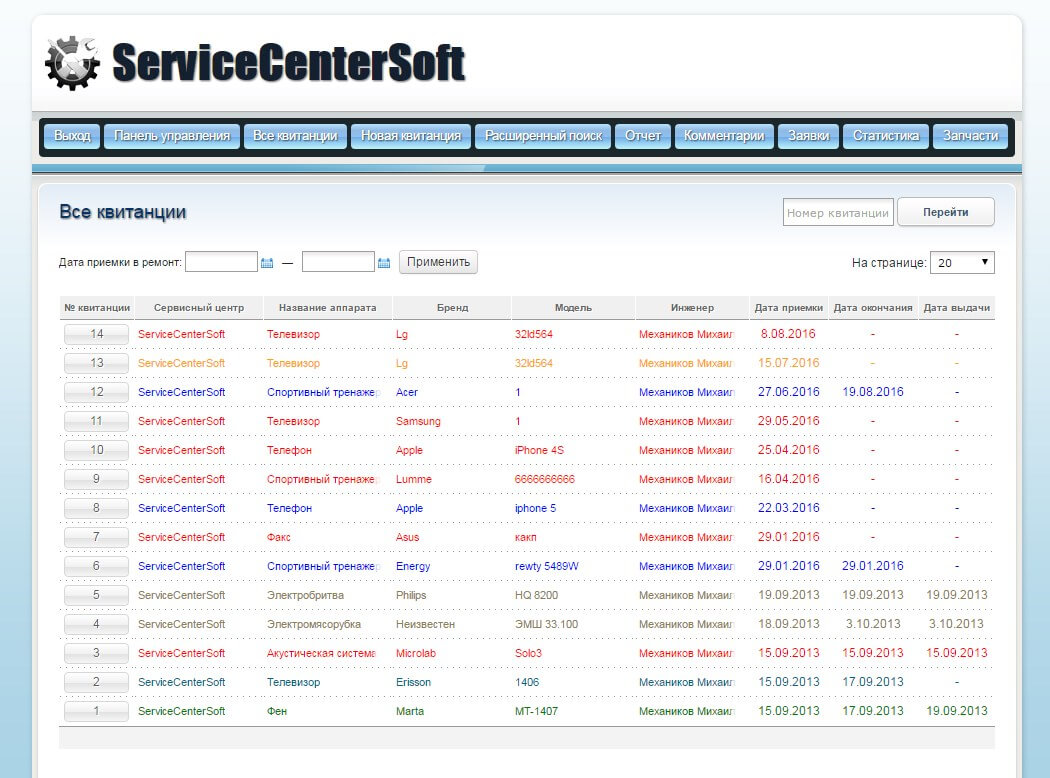
The program interface is simple and understandable on an intuitive level. All subsequent pages (sections of the program) have the same navigation. Non-receipt in the form of buttons, clicking on which you'll be instantly on specified receipt. The number displayed on the receipt page can be selected by each user indivalno program. The settings are stored in cookies your browser. To move through the pages provided navigation "forward", "back", jump to a specific page.
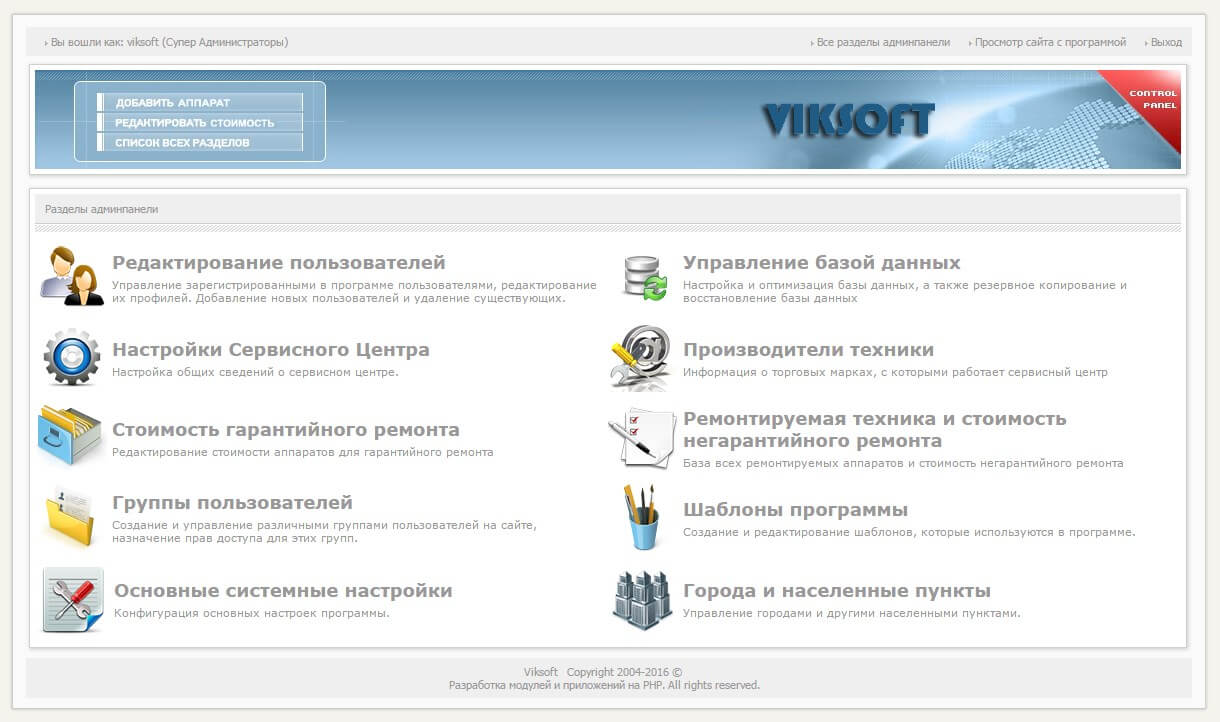
Control Panel
Control Panel (Admin Panel) is used to add users, remove, giving them a certain status, information on producers, authorized brands. Cost of warranty and non-warranty repair, the entire base of the repaired equipment is controlled from here.
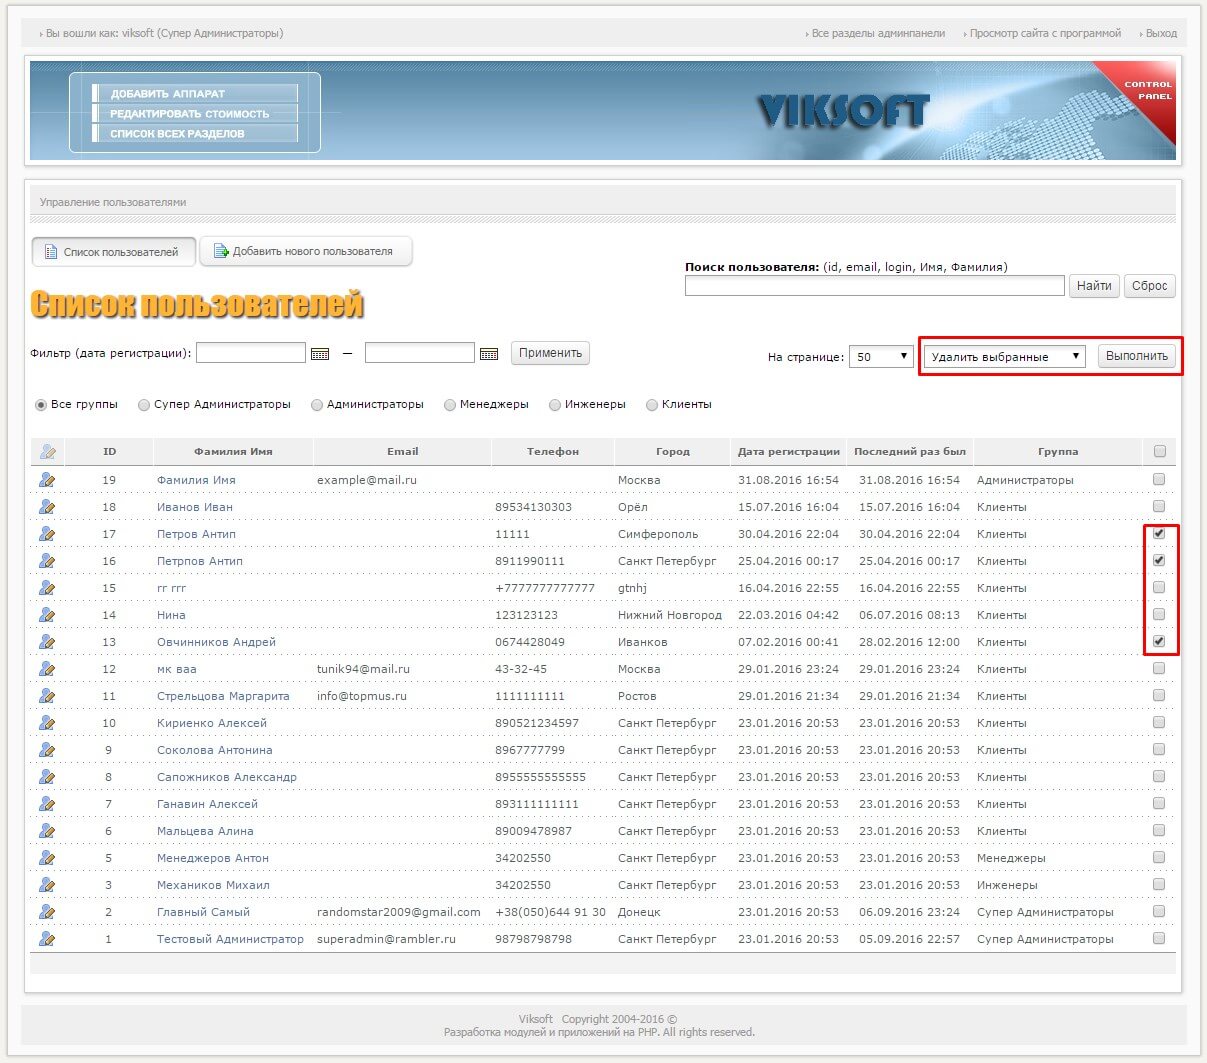
Setting up users
The program provides for the separation of user groups: Administrators, managers, engineers and visitors. You can add a new user by defining it in the group of the above. In addition, the possibility of editing user data, and user deletion, subject to certain conditions: You can not delete an engineer or a manager, which appears in at least one receipt, the user who recorded at least one receipt. To do this, you must first release them from the associated increased receipts.
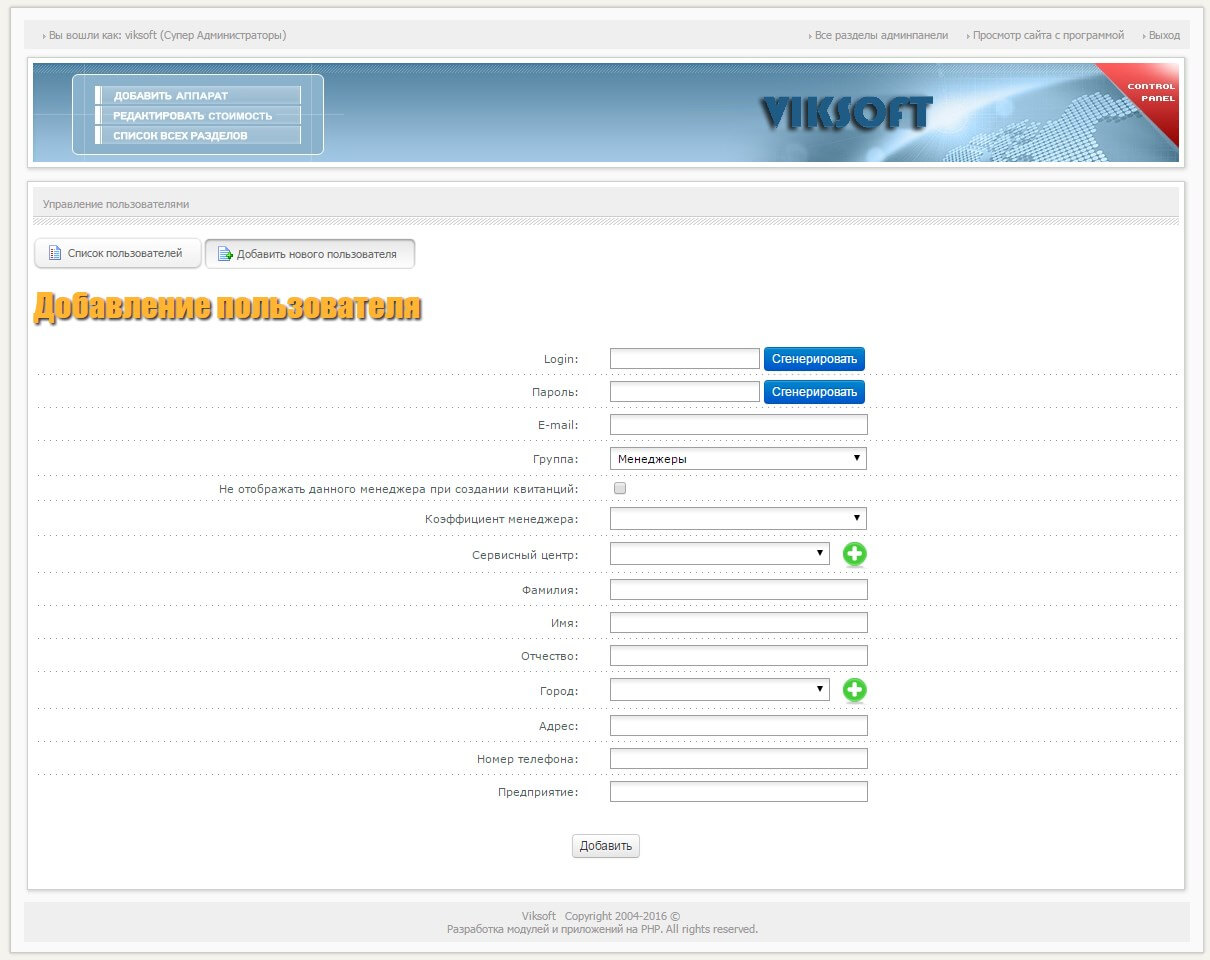
Add a new user you can by clicking on "add a user". Opening up new fields to fill. All buttons have tooltips, so much difficulty when you add will not occur. Here you can add a city, if this is not in the list of cities by clicking on the appropriate buttons.
If you have entered is not a coincidence that like, do not despair, all data is amenable to correction. We just need to click "Edit" next to the desired user (or by clicking on the name) and open the form for editing.
You can change the name, city, or other information to the user. After changes click "Change" button if we want to remove - through a "selection effect" on the list of all users of the page.
If a user is assigned the status of "engineer", it can not be transferred to another group. Remove this user can only be the case when it is not involved in any repair (not tied to receipts).
To this engineer is not displayed when creating a new receipt, you need to put a "tick" is not displayed when you create a new receipt. Click "Edit." Thereafter, the engineer will not be reflected in the list when a new engineers receipt. At any time, the removal of crows return of the engineer in the "system".
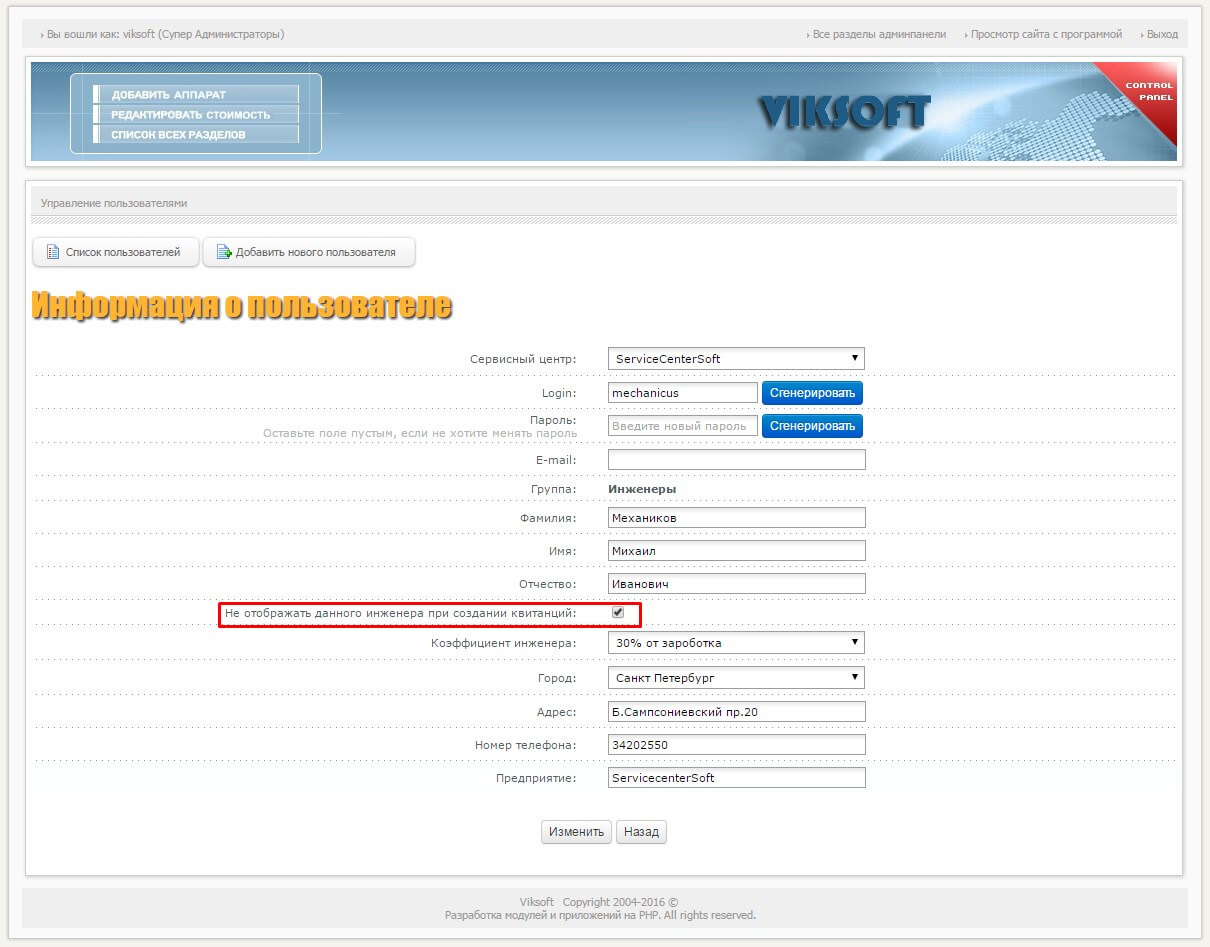
It is possible to pay for the work of engineers, depending on their qualifications. To do this, the drop-down list, select the ratio of salary corresponding to a percentage. For example, if you intend to pay the engineer half of what he earned, you need to select '50% of incomes for '. Time for details This list appears when you select "access group" position "Engineer".
When adding / editing a user, the login and password can be generated automatically by the program, for this you need to click on the appropriate button. You are free to enter the login and password, but the following conditions must be met:
- login - Latin, capital of not less than 4 and not more than 8 characters, only letters;
- password - Latin, no less than 6 and no more than 17 characters, only letters and numbers.
The same is true when the user is editing.
If you are an administrator, you can add a new service center, remove, or edit the data directly when adding a user (edit when editing a user). List of "Service Center" sets the user belonging to a particular SP. For example, the program determines which SP was discharged a receipt for the manager of belonging to a particular SP.
Create multiple CCs and every administrator, manager and engineer. Created SP is ready to accept clients!
Admin Panel contains icons that are pressing you switch to the other tabs "Admin Panel". All the icons have tooltips.
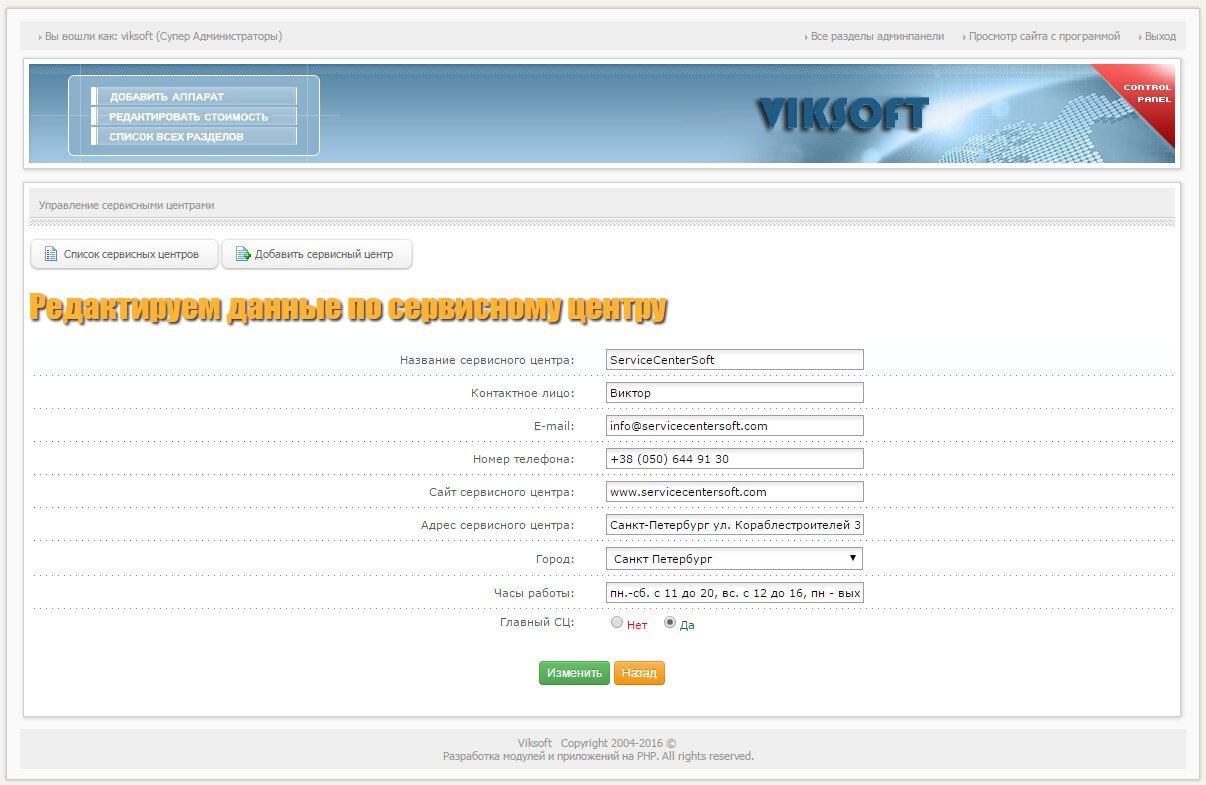
The settings of the service center
This tab is "admin" is used to add, delete or edit information on the main SC and flialah. This information is printed receipts.
- The name of the Chief of the service center - the name change on all pages;
- City where the service center;
- Telephone service center;
- Contact Person Service Center;
- Home page of the program - is a site where any user (eg client) can see how to repair his vehicle flows;
- Address of the service center;
- e-mail service center;
- Opening hours of the service center.
After changing the settings, do not forget to click the "Add / Edit". branches settings (if any), which can be changed in a similar manner. If a new branch - you can add information about it by clicking the "Add a Service Center."
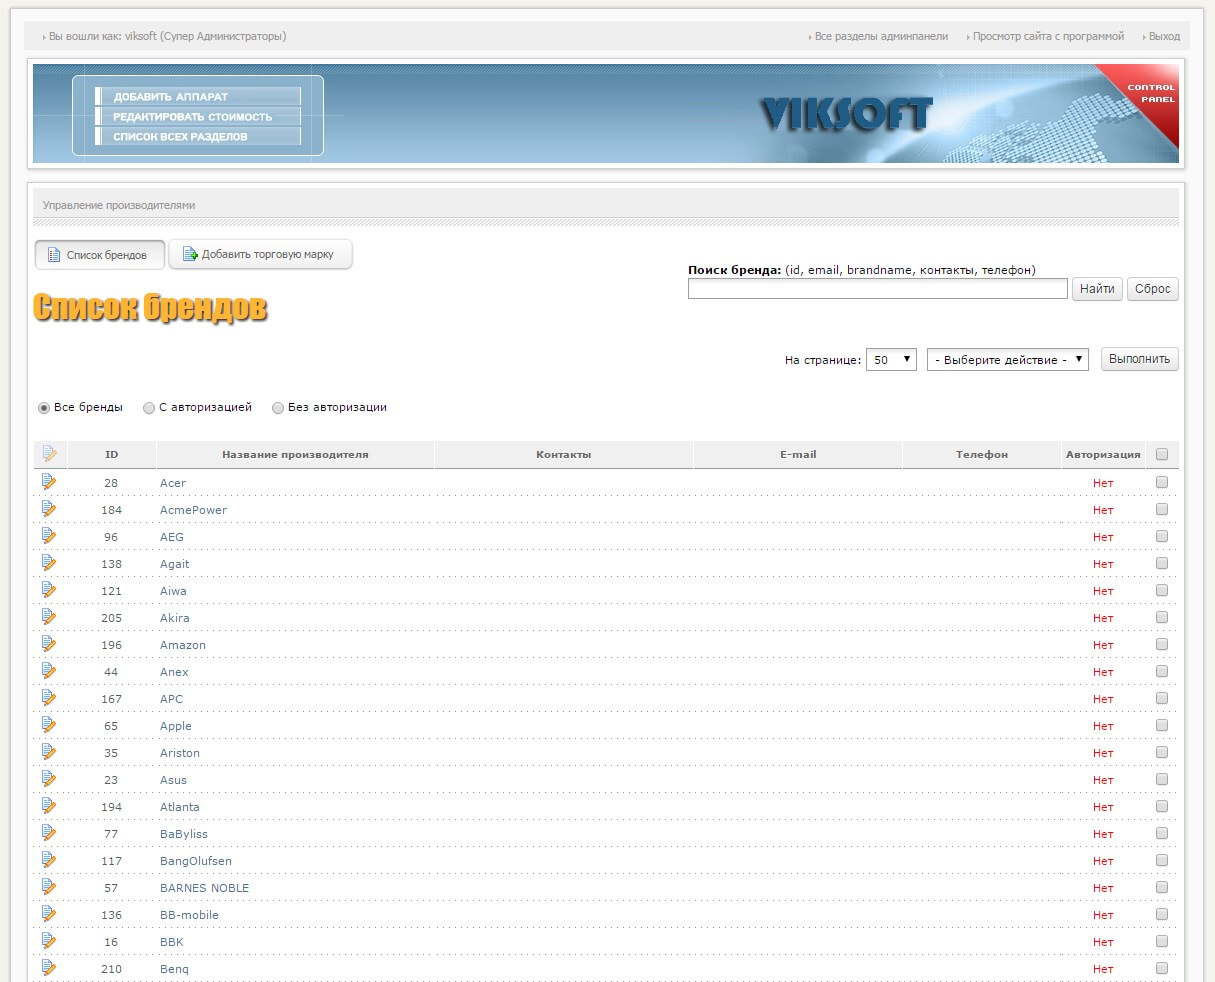
Manufacturers
Entering the link manufacturers can obtain information about the producers of repaired equipment, and add information about the new producer and edit the data on the existing manufacturers.
Manufacturers - trademarks, repair of which the payment or guarantee. If the table contains the manufacturer authorization date (this is the date when the contract was signed on warranty service of products of this brand).
If the authorization date is not specified, or is '0000-00-00', the producer of "misses" the warranty repair and all units under his name can only be taken as a non-warranty repair rates for the repair of equipment of the TM They will be taken from the repair cost of devices, which repairs - non-warranty. These rates are listed in the "admin" as "Refinish Technical equipment and the cost of warranty repairs."
Table "producers" should contain full information about the manufacturer in the case where SP receives parts from the manufacturer. E-mail, the address of the manufacturer appear in applications sent to the parts. In addition, it is convenient to keep on hand contact data representative brand.
Base units
In addition to users and manufacturers, admin panel allows you to add, edit and delete phones taken your odds and record prices for non-warranty repairs. Adding, editing, or deleting devices is carried out similarly to the users. You can not delete devices that are used in the receipts.
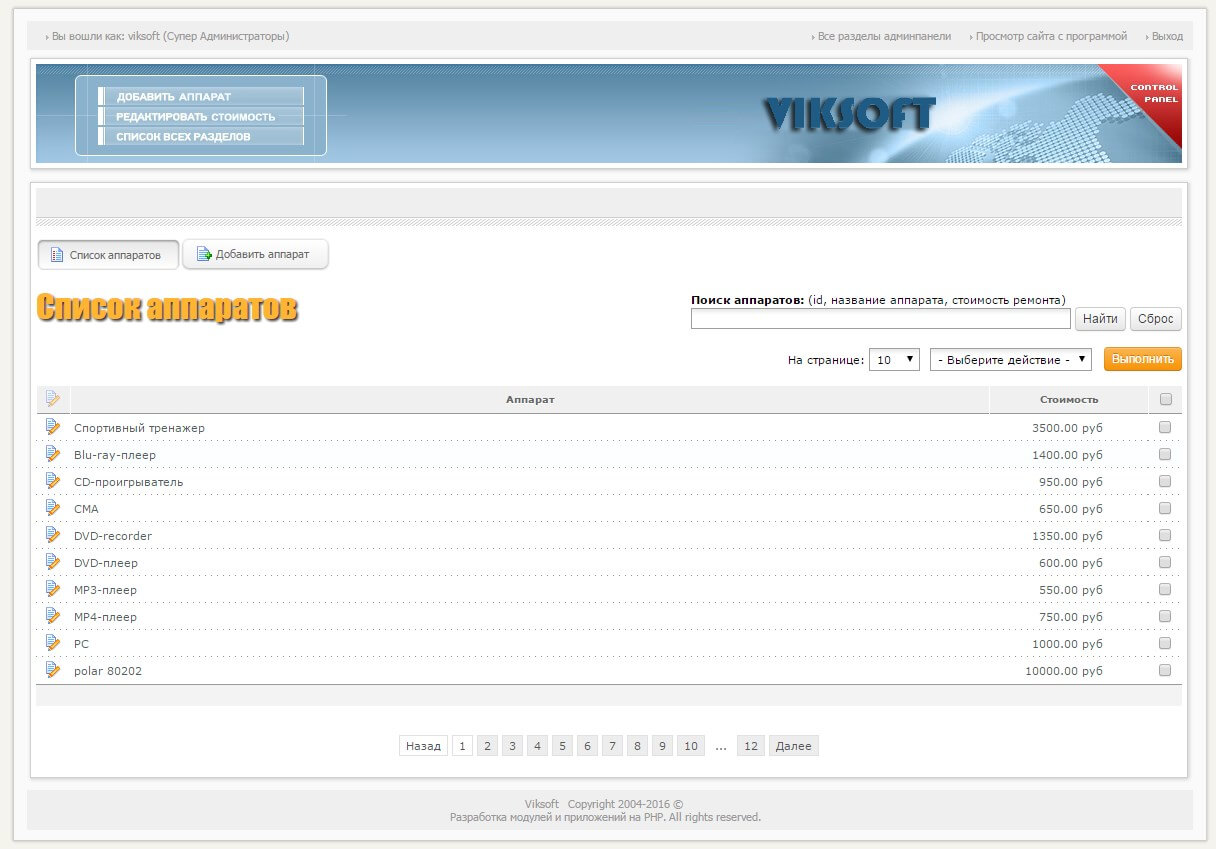
Price, on the other hand, said the device corresponds to the cost of warranty repairs for any brand.
Cost of warranty repairs
This tab allows you to set individual prices for warranty repairs at any particular manufacturer.
It is very important to be able to calculate a differentiable repair, because many brands pay for warranty repair devices, depending on the results of the repair.
If there was the replacement of blocks, boards entirely - one value fuse replacement - another repair to component level - the third.
Therefore, the program provides repair categories for such cases.
The page provides automatic sorting Authorizing TM and also have the ability to quickly search. How to make a trademark authorized - see above ( "producers").
To add a new position, you need to first in the window that appears, select the manufacturer, then select the category to create the right if necessary. If the repair is not differentiated, the category should be named "Uncategorised".
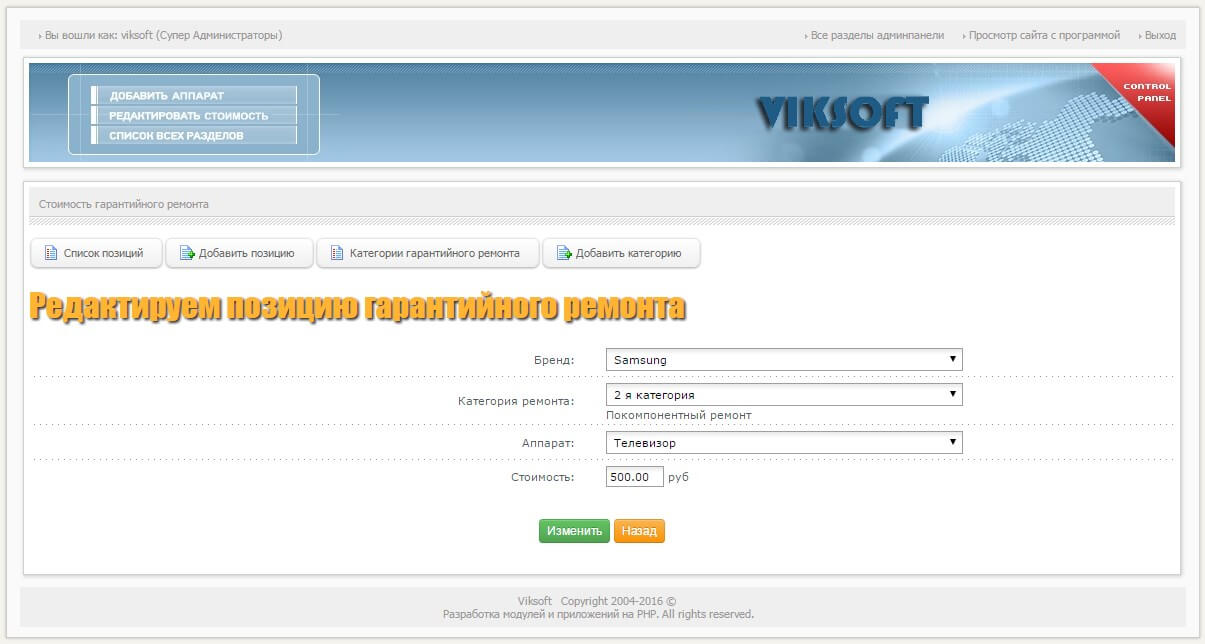
When editing a sequence the same!
Receipts
Receipts are required for accounting adopted in the repair of vehicles and must contain the information: who, when and how much ...
It is important to try as much as possible to facilitate the reception of art, bringing his hands to fill the required fields to a minimum, thus, if possible, use the auto-complete information about the client or repaired machine.
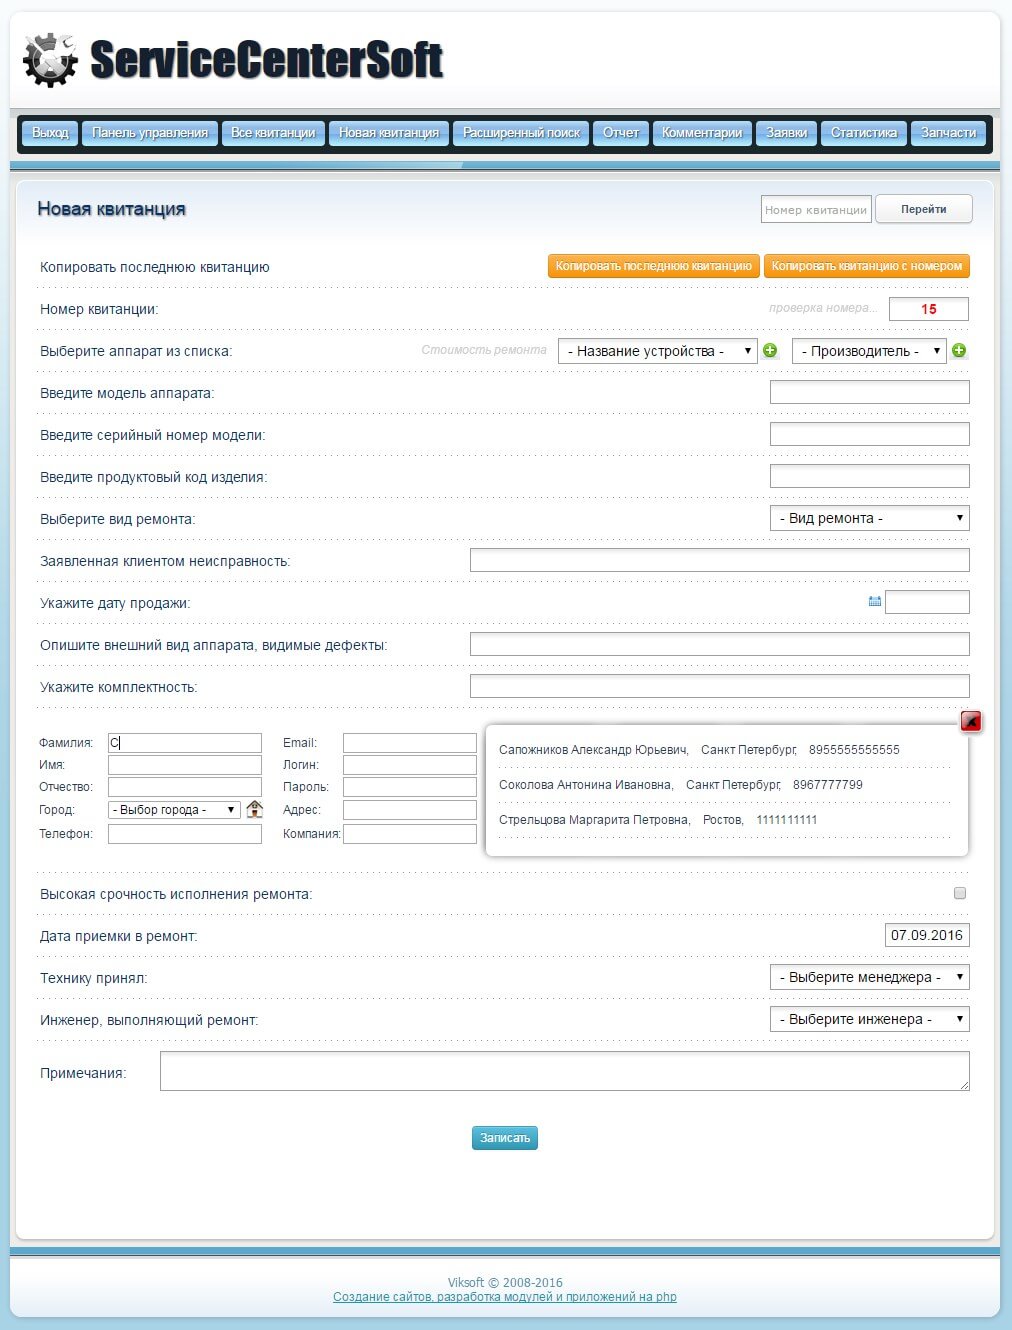
Adding slips
To create a new receipt is enough to fill in the relevant information about the received repair machine, specify a user's contact data, machine dealer for repair.
In the upper right corner of the page is a form of quick access to any of the receipts. You must enter the receipt number and click "Go" or use «Enter» on the keyboard. With this you will be redirected to the page with detailed information on the receipt. Access to the form of fast access is configured in the administration panel, in the user group settings for each group.
The following forms are two shortcut buttons that allow you to copy receipts. This function is useful if you take the party to repair the goods of the same name from the same client. When this is spared much of your time.
Room for a new receipt is automatically selected the maximum of those that already exist in the database. But this does not mean that you can not use the receipt number, which is in the middle of the range from one to the maximum number. Such cases may occur when you delete any of the receipts. When you enter the correct (desired) number of the receipt system will tell whether this number is free or busy.
After selecting the device from the list, you get the right information on the minimum cost of repair or diagnostic repair. This information is pre-recorded in the administration panel, in the "Refinish Technical equipment and the cost of warranty repairs." To quickly add a new device, which was not on the list, provided quickly add button of the new device. The same button, with a similar assignment is a list of "producer" or "commercial brands." Brands can be pre-filled in the administration panel, in the "Manufacturers Technology" section.
Entering the machine model, serial number, product code, choose the type of repairs and other text fields will not cause issues, but on some points concerning the addition of information about the client, I would like to elaborate.
When you type the first character in the "surname" system offers options to users whose last name contains the typed characters.
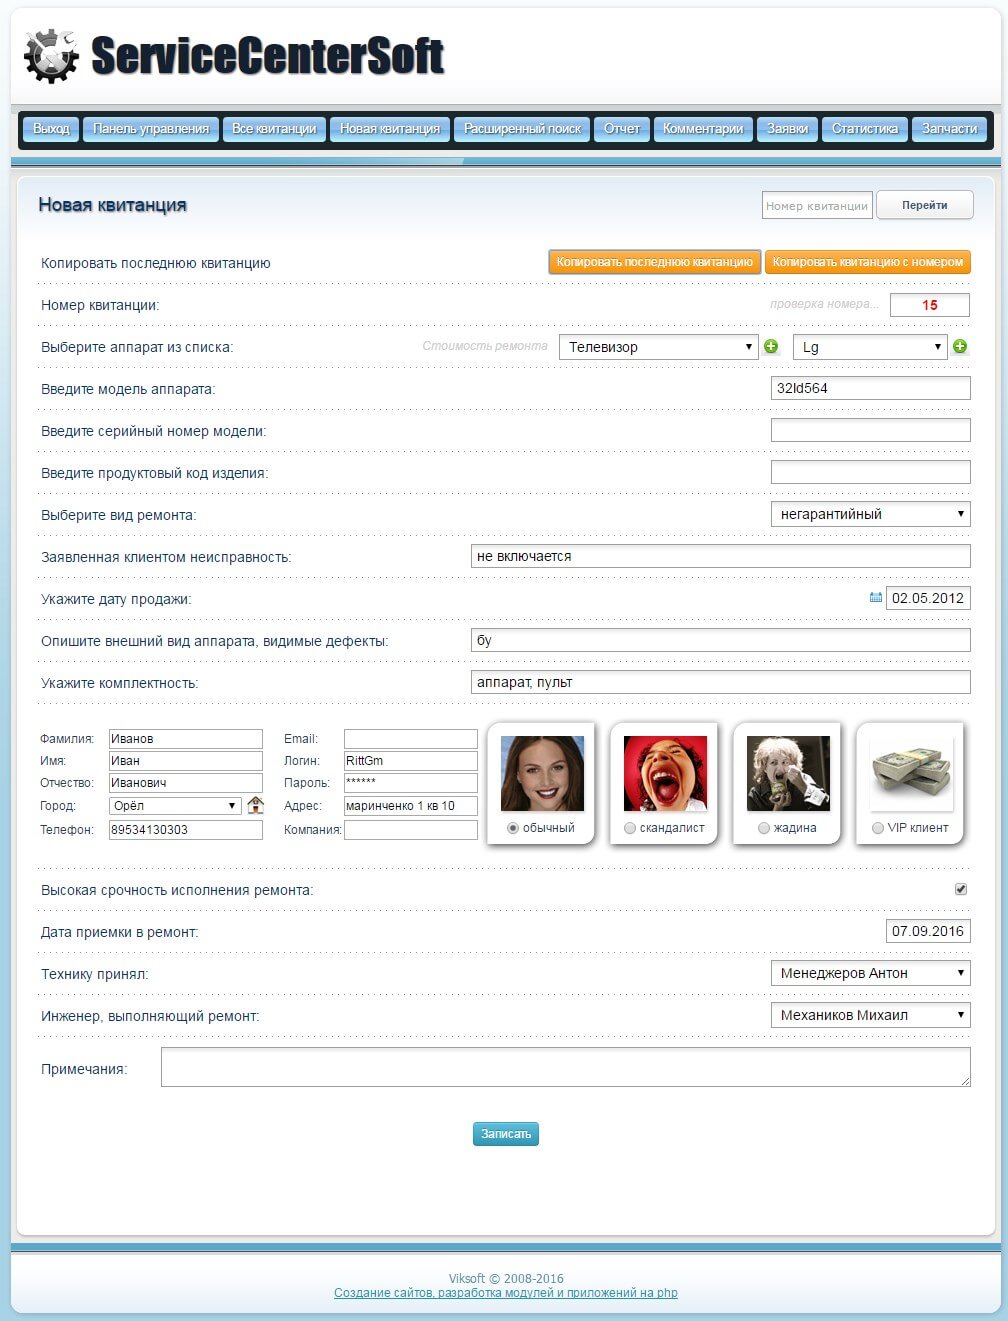
You can select the desired customer from the list by clicking on the appropriate line. In this case all of the information associated with that user will automatically fill in the appropriate lines. If you still do not have correspondences with existing customers in the database, you will have to fill in all the fields of the user manual. The city, which has not appeared on the list, you can also quickly added through a modal window. For this is a button with an icon of a house.
When you enter the phone system automatically generates schestiznachny login and password for a user, you can substitute whatever order you a sequence of characters. The password can contain from 6 to 16 characters of any kind. Login: 3 to 30 Cyrillic characters of the Latin alphabet, umlauts, tsifer, dash or underscore. If you used when entering the field of prohibited symbol - the system will inform about this when you save the receipt.
It is important to understand that the username and email - must be unique (not to have duplicates in the database). And also to remember the rights assigned to the user change the data. Only the holder of such rights and provided that the edited client is able to make changes to the user information in the section "New ticket". In all other cases, the user data need to change to take advantage of the administration panel, in the "User management".
View receipt
Here you can check if the receipt is completed and move on, or in the "Repair" section or the "edit receipt" section. From here you can print the receipt by pressing the button "print" or "certificate of completion". This window is a "crossroads" from which to start editing or repair. It is here you will find yourself out "all receipts" or filling out the form in the upper right corner of any partition.
On the other hand the date of issue of the field, set button "to set the date of issue." Clicking on the current date and the status of the unit will be set to "issued". Fields' date of the completion of repair "," state of repair "and" date of issue "can take different colors. Reserved item - orange, the unit is ready and issued - green, in the work or not issued, but ready - red.
This is done to improve visual perception.
In the upper right corner of the displayed image, which characterizes the client.

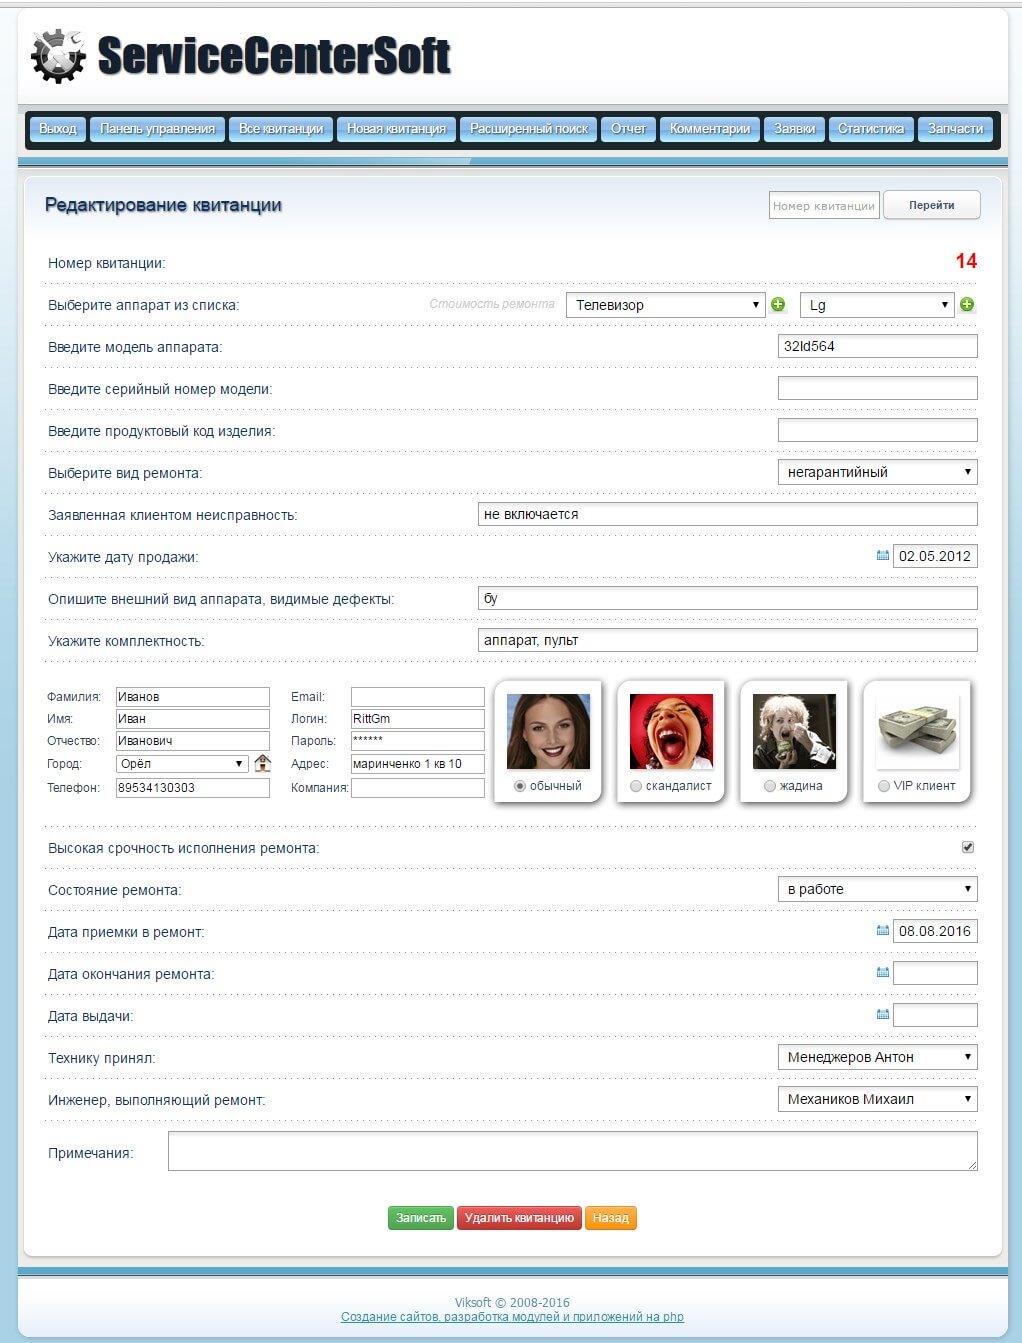
Editing receipts
If for any reason you decide to edit the receipt, click on "Edit" in the "form of a receipt." A dialog box is very similar to the "creation of a new receipt, except for a few moments (Fig. 13). Here you can, among other things, edit the "end date of repair" and "date of issue". It is enough to leave the field "date of issue" empty and the unit will take the status "ready" and not "issued".
When you click on "record", the message "receipt of updated successfully." You can on this page to delete the current receipt (the button "delete ticket"), at the same time, after the removal, you will find yourself in the "all receipts" section. And also, you can go back to the section "view of the receipt" is not recording any changes ( "back" button).
Removing the receipt
Deleting receipts - an irreversible process, return to this action has not.
Remove receipt is only possible on site (only in the client-side), on the page editing receipts.
Before removing the system will ask you: Are you ready to finally remove this receipt?

Repair of apparatuses
View information about manipulations with the device: who and what to change, what parts ordered, when, how much it costs and other details can be VNA "Repair" page. You can leave a comment as a SC representative and the client.
It is possible to inform the customer about the repair completion via SMS or email
Customers will be happy to track the status of the repair devaysa Rented them.
Repairs
warranty repair differs from non-warranty is to display the drop-down menu with the categories of repair (if indicated).
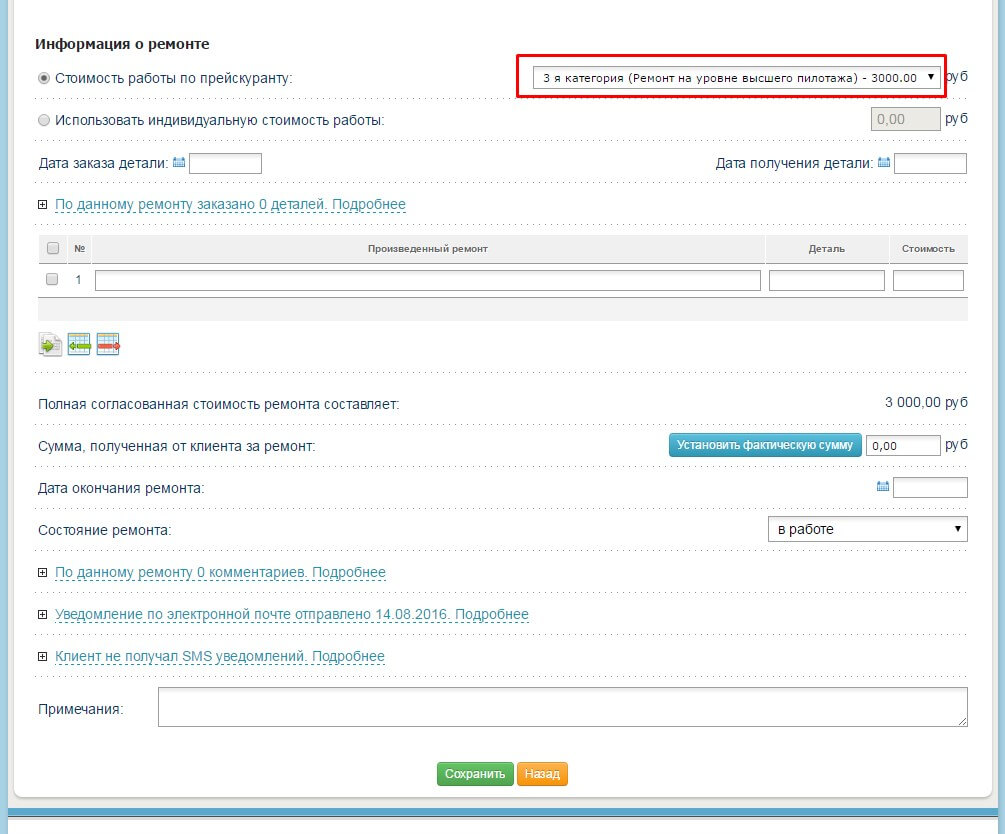
You can press a button and burn "actual repair costs (price + details)" in the field "The amount received from the customer for repair," or specify desired.
There is an opportunity for everyone to use repair "the individual value of work" and indicates there is any amount, fair in your opinion, for their repair.
On this page, set the date of the repair.
It also established and state of repair: the work (by default) is ready, commissioned item, write-off act, without repair.
Table "produced Repair" is able to add a line, copy the existing, deleted selected. A prerequisite for copying or deleting rows in a table is: the selection "checkbox" on the left, next to the line. You can select all rows, noting "checkbox" in the header of the table. In the "Value" can not enter characters other than numbers and points (to separate the integer part of the fraction).
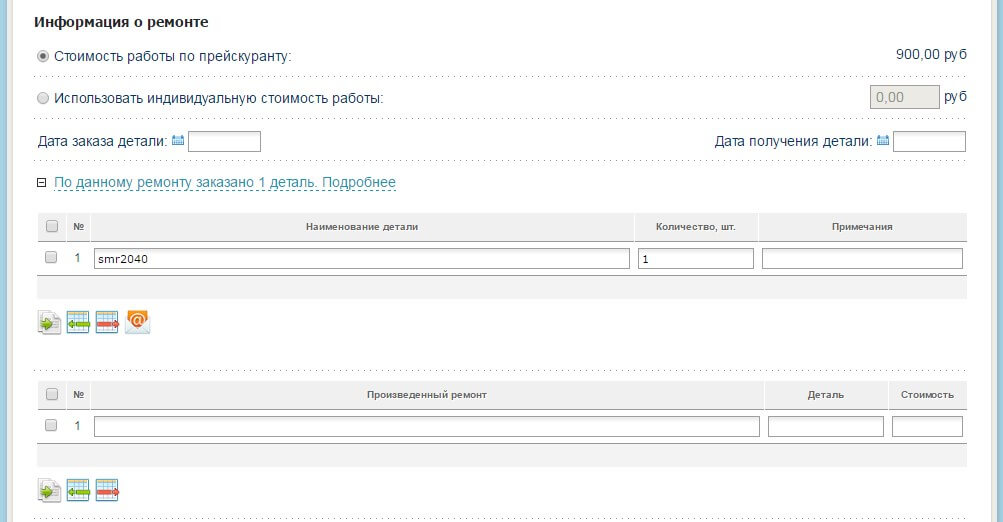
When you create a new repair receipt is given the status "in work". Upon completion of the repair engineer must install the repair status of "Ready", "non-renovated" or "write-off act." Here you can order the same items, then the status of the repair should be installed as a "commissioned piece" and specify the date of the order details (important!). To open the plate with the ordered items you need to click on the words: "According to this repair parts ordered zzz, more ...". ZZZ - this is the amount of detail that ordered the engineer. Working with the order details table is similar to the above "produced repair." There is a difference - is the availability of a button "to send the selected application parts" (envelope with a dog).
parts Ordering
To send a parts manufacturer needed a table row you want to select and click on the "dog". This will take you to the tab "Application for spare parts." If you change the contents of the rows in the table, highlight the line again and the "send" again, the application submitted overwritten.
After receiving the parts of the application, be sure to include the date of receipt of parts. All the customer sees is out of your account. Do not upset the customer, even if he sees when ordered spare, and when received.
Do not forget to specify the "end date of repair," even if the unit is issued without repair.
All changes will take effect when you press the "Save" button located at the bottom of the page.
Comments
This section involves adding or removing comments, keep records of their number on the repair. To add, view or delete comments, click on the link "According to this repair XXX comments. More "while the unit is revealed with all the comments on the repair button and" add a comment ".

All comments are arranged in descending order, by date. Comments can only be removed by the Administrator or the person who has access to it.
When adding a new comment, it automatically appears in rezdele "Comments to the repairs."
Message to the customer e-mail
The program involves sending text messages to alert the client about readiness unit, matching points to pay for repairs, etc.
Initially, at the entrance to the repair page, you can see whether a message sent to the client or not. If yes, then it will be visible inscription with the date and time of sending the last message.
To send a message, you need to open the unit to the posting form and click on the "Send E-mail notification". In this case, you can correct the text to send, at its discretion.
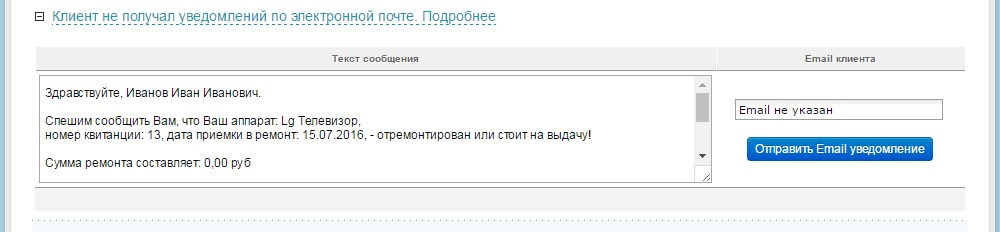
A prerequisite is an indication sending email Email client, which must be sent a message.
When filling out a receipt for the acceptance of the device in for repair was specified e-mail client, it will be displayed in the text field "e-mail client."
You can send a message to anyone with any receipts. To do this, you need to specify the e-mail recipient and compose a text message. The program will make a record in the database only if the specified e-mail correspondence e-mail-user (on which a receipt).
Configured directly in the browser, where you work, and is setting the indentation (the upper and lower 0), and headers and footers (remove all headers and footers) and you will be happy! Below is a screen printing receipts in chrome. As you can see, everything fits on one sheet.
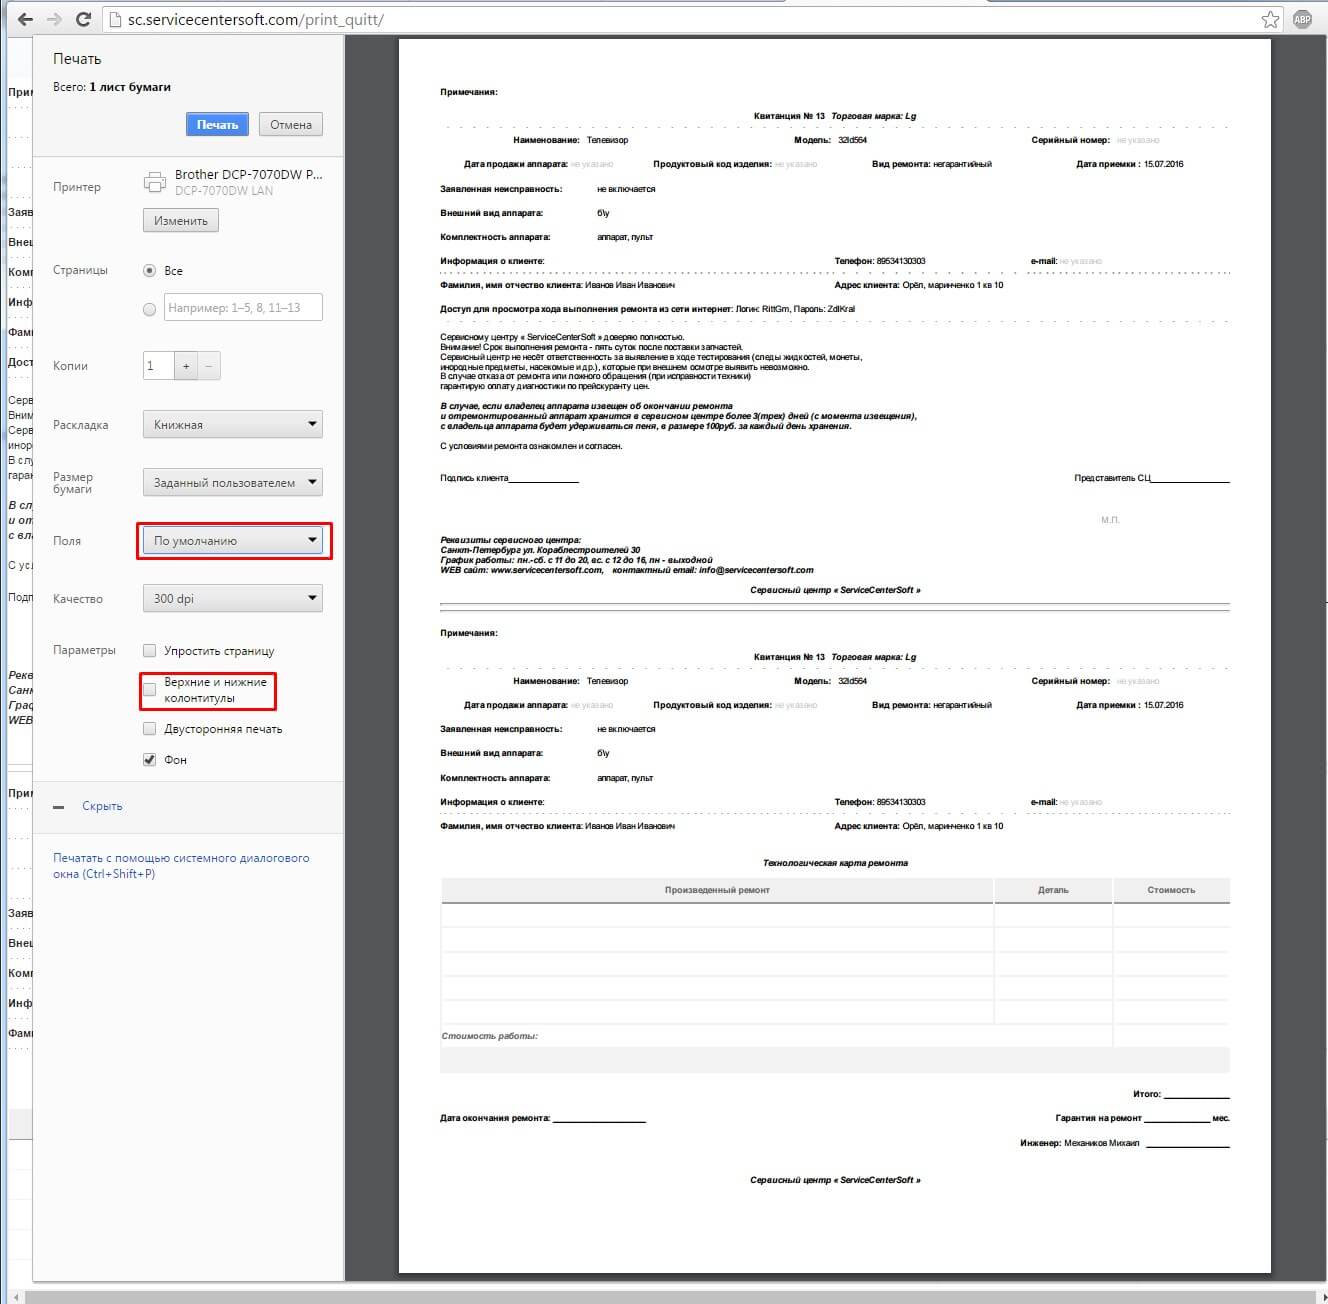
Print receipts consists of two parts (on a single sheet of "A4" size). The upper part of the receipt given to the customer before the repair is kept from him. The bottom part - remains in the SC, filled with an engineer and after repair is given to the manager for entering data into the program. Next to this receipt, you can do anything (to keep, discard, etc.). In any case, the receipt is stored in the database.
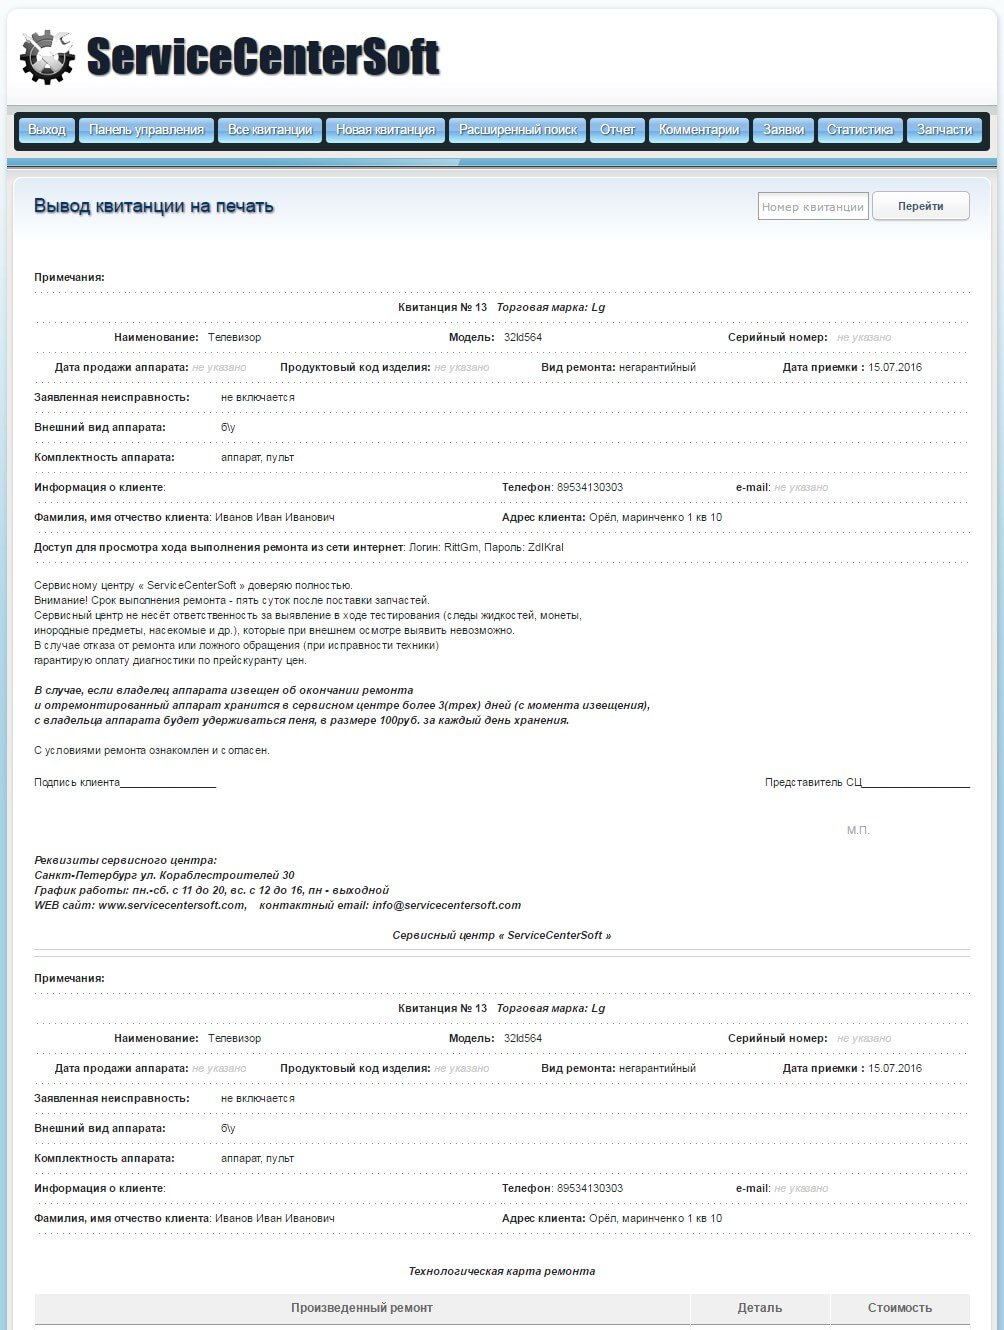
A receipt is printed immediately after the registration of the device in for repair.
On completion of the repair when the customer came to pick up the machine, he removed a receipt issued by the SC (upper part) and the printed "certificate of completion".
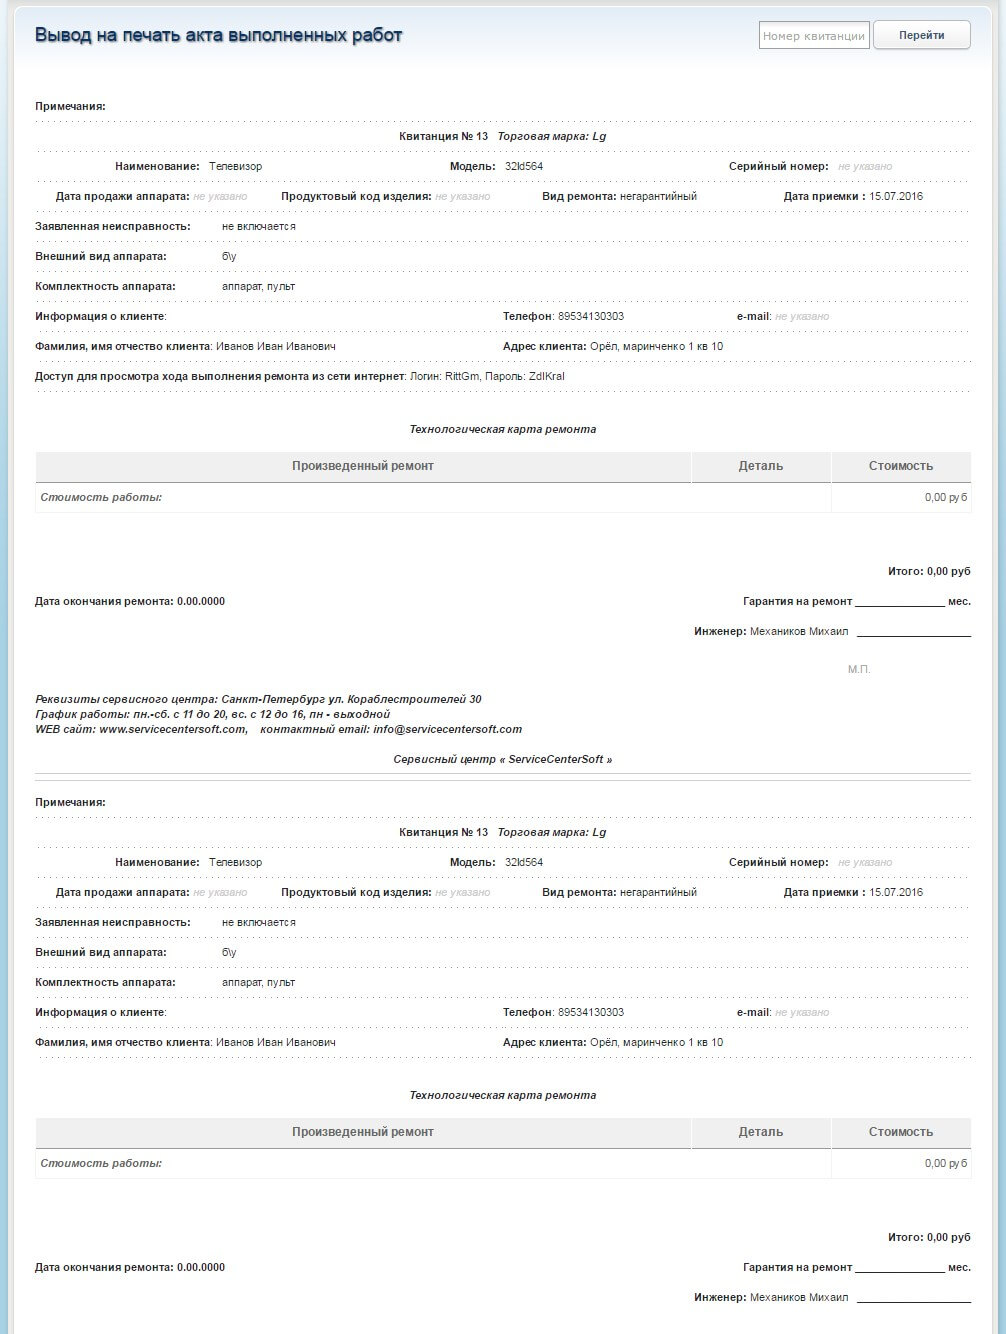
The upper part of the act is given to the customer, the bottom remains in the SC. Customer satisfied, in SC there is no problem (well everything)!
Advanced Search
It allows you to search receipts by numbers, machines for the model name, serial number, the product repair, of repair, by the date of acceptance, date of issue, the customer by name, sort by the engineer, as well as to specify the interval for the date of acceptance, the issuance, the repair (from up to ...) From you only need to generate a request is correct and click "Find." You can also select all the receipts belonging to a specific service center.
Example: Find all the receipts, which occurs in the repair "CT - 315" and the acceptance date is in the range of "01/08/2015" to "09/01/2015"
Choose from the dropdown list "--- the search criterion ---" string "manufactured repair" and the meaning for which searches are introducing "CT - 315". Where the date of receipt, enter the appropriate values. It is important to understand that the program needs to specify where to search (this search term) and what to look for (the value by which to search). If the value for which you are searching for is left blank, the program will display all the receipts. Further, in the search results click the button with the receipt number and see what you were looking for.

Administrators, managers and engineers of various CCs can see receipts of other CCs, but can not change anything. SuperaAdmin can.
If you enter in place of "CT - 315" "CT-315" (the difference in the absence of gaps), the program will report that no results. Therefore, it is important to understand that it is better to write "315", it is certainly there. Register of letters does not matter. After some training, job search principle becomes clear.
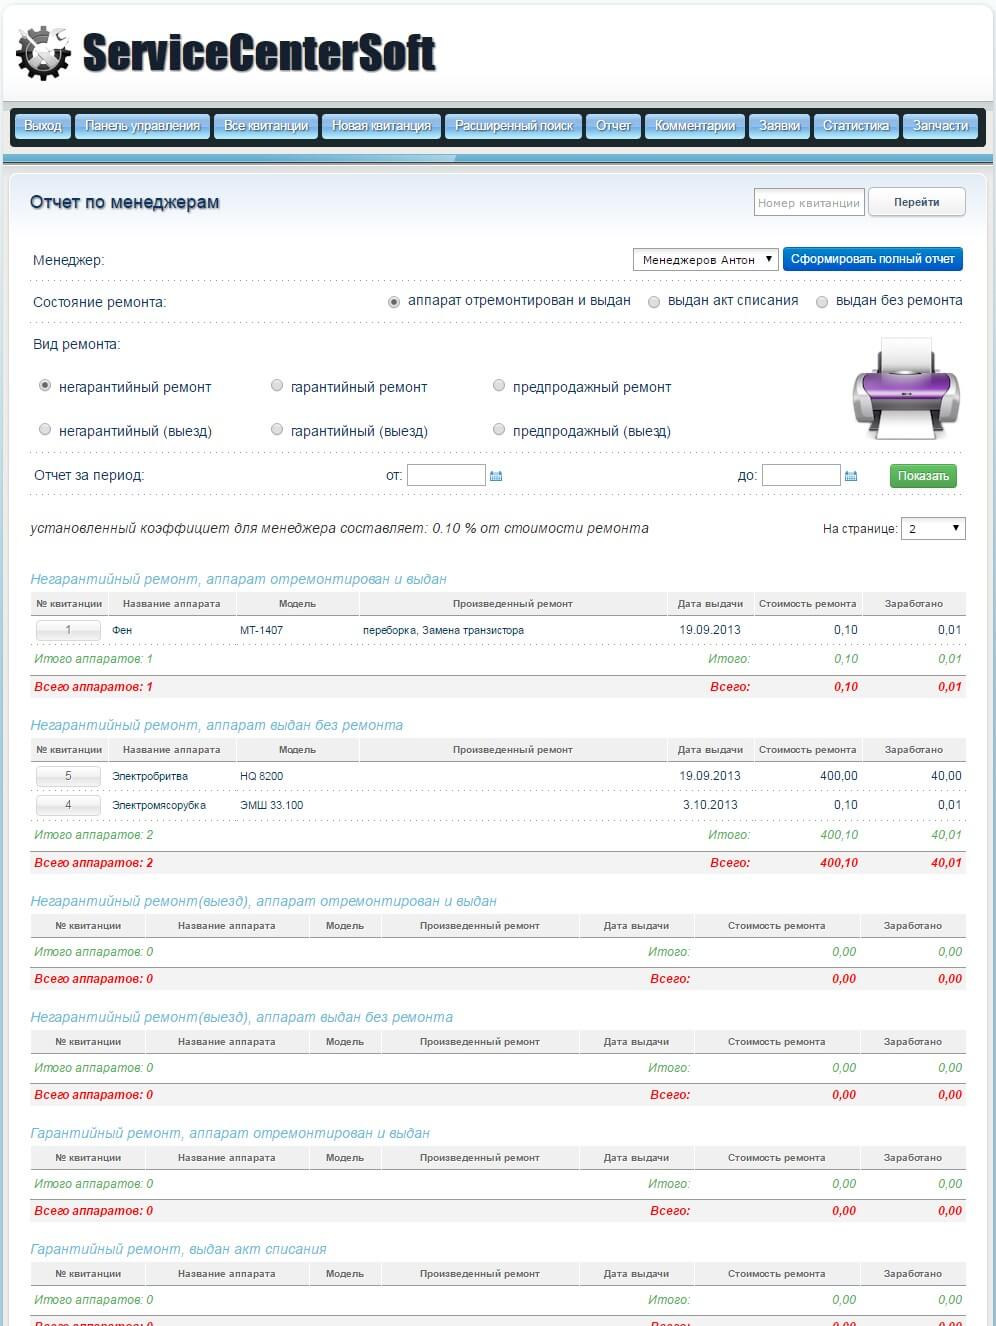
Report
This section of the program is needed to calculate the engineers or managers of their earnings for a certain period of time.
Consider the case of engineers.
Every engineer from under your account can only see your earnings. By paying only available ready-issued devices.
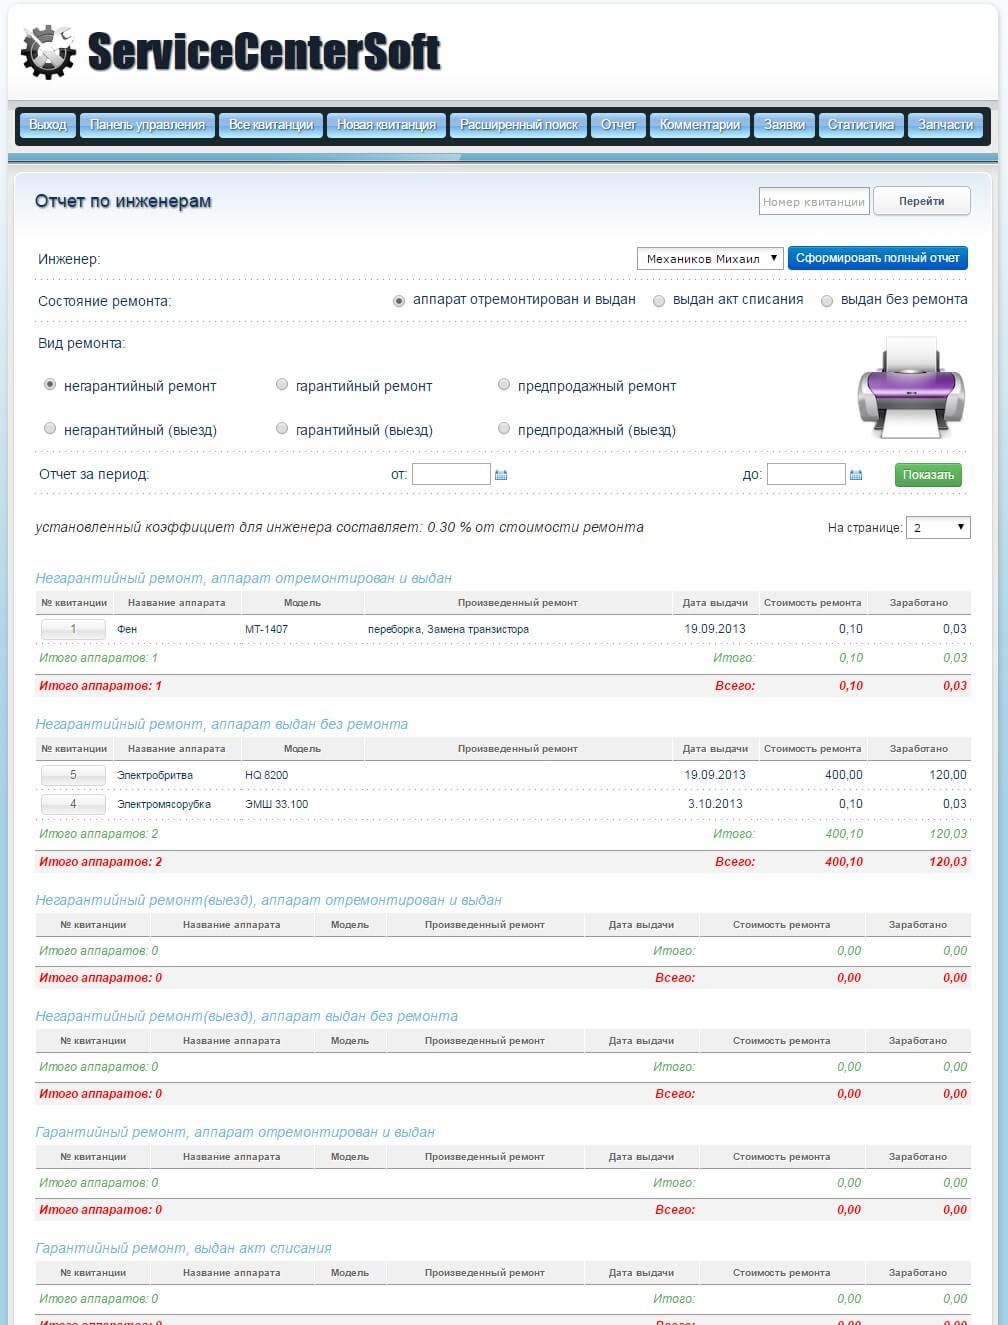
You can also view how many machines were scrapped or given without repair. If you do not enter a date "for the period" the program displays all the repairs on the engineer for all time.
It is possible to generate a complete and selective reports for this purpose are the control buttons. For a sample report you must choose what repairs you want to view (note the "state of repair" note "type of repair," indicate "period" and click "generate a selective report on the engineer").
Administrators and managers can see the amount you earned and the amount received engineer SP.
The program automatically calculates the engineer salary in accordance with the "engineer coefficient".
Engineer receives an amount equal to the "pricing on the price list prices" x "factor engineer." If the final amount for the repairs below the prices (unit issued without repair and diagnostics client took the payment), the engineer receives a sum of "total repair cost" x "factor engineer." The remainder of the total cost of repair is SO.
Of course, all this can be printed ...
It works similarly to section managers
Statistics

It includes three sections: general statistics odds, statistics on managers and statistics for engineers. The overall statistics are displayed data about how many units were made, repairs, outstanding, written off, given without repair, etc. for the current year, month, and quarter. And you can see tighter statistics for a specific period. Statistics for engineers and managers to reflect the same figures.
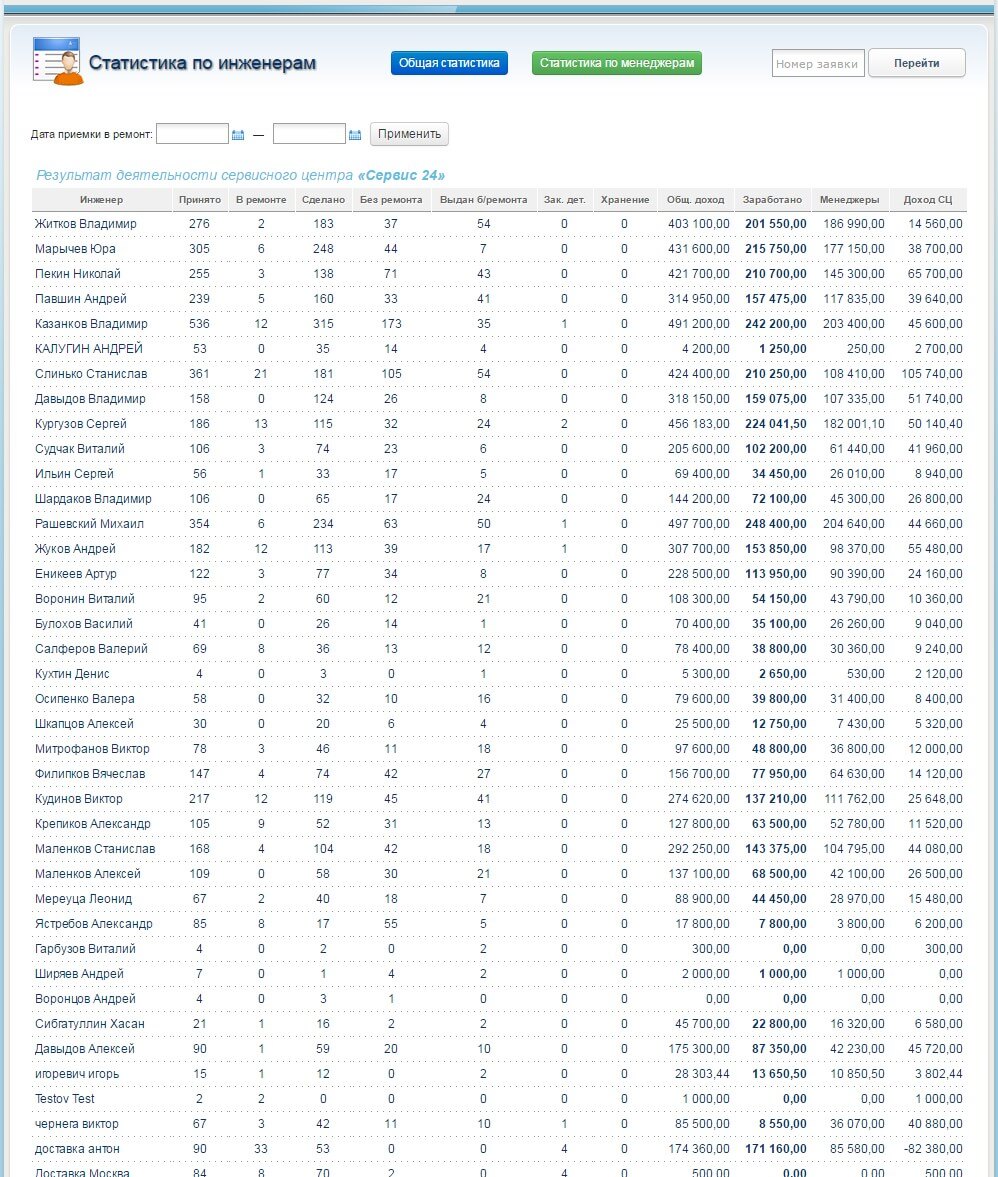
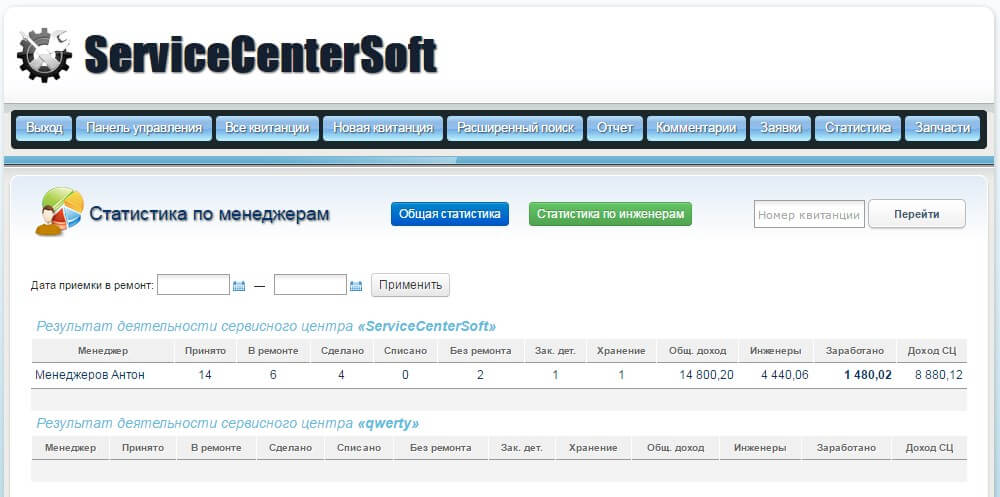
For Super Administrator displays statistics for all service centers. It is good that it is possible to draw conclusions about the appropriateness of the content of SO to low-income or engineers, the amount of repairs that leaves much to be desired ...
Access to this section is adjusted in the settings of user groups.
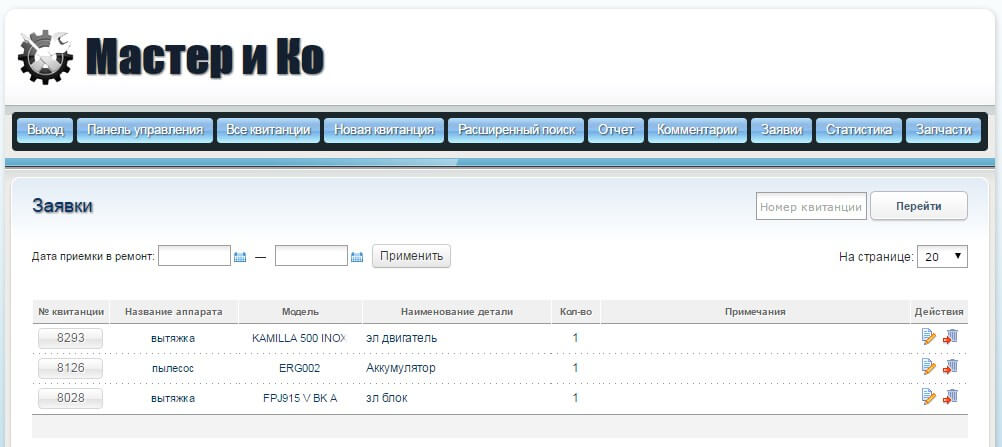
application
This section contains information for the administrator and manager about what items need to be ordered for a machine this item is.
How to create such an application was considered in detail in the "repair".
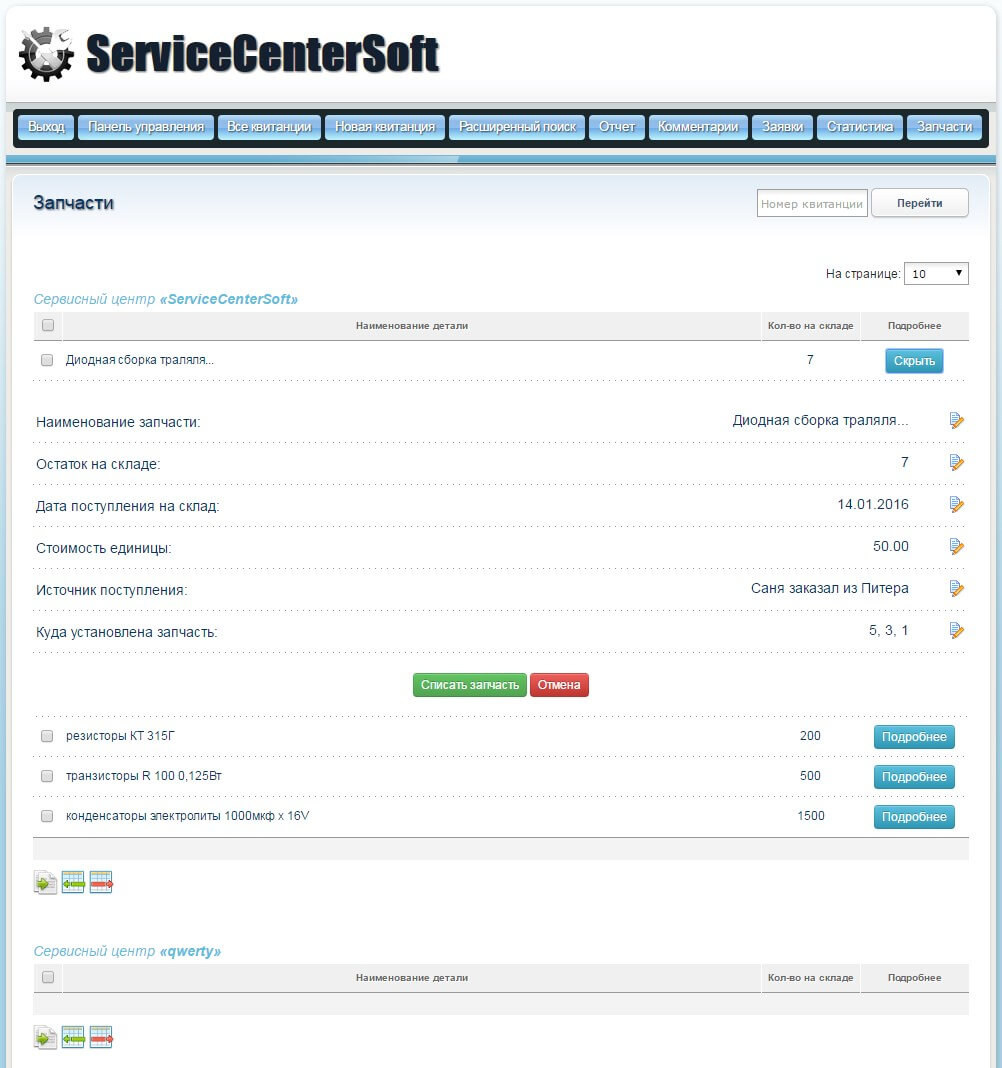
Spare parts
This section keeps records of received service center and spare parts consumption for specific repairs.
Fill out the fields in the table in accordance with the cell names. To keep track, but this spare part if the machine has been installed on this receipt, you just need to dial the number of the receipt in the upper right ulu workspace program and press the "go" button. Then we follow in the "repair". If this item is used there it means everything is fine, if not → all questions to the manager or administrator (why he copied item on the receipt, where the spare is not in use?). You can use the "advanced search" by entering the name of the parts. If the number and the same number of receipts - everything is fine, if not - "debriefing"!
How to add, copy, and delete rows in the table paint is not necessary, for this is the appropriate buttons under the table.
Super Administrator can see all received and spent parts of the service centers.
Comments
This section displays all comments that exist in the database, by publication date descending and enables the Administrator to delete any comments that do not comply with the restrictions. It is possible to display comments for a particular period of publication.
Adding a comment seen in the "repair", but there you can add a comment to repair!
By clicking on the receipt number, you can go directly to the "repair" of the receipt, where chosen by a comment.